Adding a selector
You can create a selector for a business object,
for example to customize the display of reference fields of this business object.
for example to customize the display of reference fields of this business object.
Procedure
1. On the navigation panel, go to > .
3. On the action panel, click Add.
4. In the Business object definition dialog box, select a relevant business object and click OK.
5. On the data panel, complete the available fields for the new selector.
For a description of these fields, refer to Selector fields.
6. Click Save.
The selector that you have added can be referenced in a web definition. By default, the selector has a set of predefined blocks and fields. You can add or remove fields in these blocks.
You cannot change the business object after it has been selected. |
Adding a fixed filter to a selector
You can add a filter to a selector, to only display relevant results for a business object's reference field.
A filter contains one or more selection criteria that you can use to quickly select and display a limited number of results.
For example, instead of displaying all assets, you display only the coffee machines.
Procedure
1. Go to > .
2. Choose a selector.
3. On the data panel, in the Fixed filter field, click on the Select a value icon.
4. In the Fixed filter dialog box, set relevant filter criteria. See Troubleshooting: Field is missing from a fixed filter, for information on adding fields to the filter list.
5. Click OK.
6. On the action panel, click Save.
Users selecting this reference field on a web form, will see the filtered results, based on your selection criteria.
Configuring info fields
You can provide end users with additional information on reference fields, by configuring a selector.
For example, if users select a person in a reference field, you can have the photo, department or other details of this person displayed on the Info block. Additional information like this can help users to verify that the value that they are about to select, is correct.
For example, if users select a person in a reference field, you can have the photo, department or other details of this person displayed on the Info block. Additional information like this can help users to verify that the value that they are about to select, is correct.
Procedure
1. On the navigation panel, go to > .
The following example shows how you can configure info fields, by using a selector on the Properties business object.
◦ Properties
◦ Spaces
3. Click the selector for Properties, expand it and select the Info block.
4. Add the following fields:
◦ Image
◦ Address
◦ City
◦ Postal code
Currently, only the following image file type extensions are supported: JPEG, JPG, GIF, BMP, PNG. |
6. Add the following fields:
◦ Description
◦ Property (the Properties selector is selected by default)
◦ Space (the Spaces selector is selected by default)
7. Save the service request definition.
8. Open the corresponding web form and view the result.
The info fields you added are displayed under the Property field.
Adding a CAD Viewer selector
You can configure a search block and a CAD Viewer block on a Publisher form.
Procedure
1. Go to > .
2. Find a relevant selector, either for personnel, spaces, workspaces or assets.
3. Click the selector.
A CAD viewer block is available on the selector.
4. In the CAD viewer web definition field, select a CAD viewer web definition.
5. In the Show inline field, select Yes to have the CAD viewer shown 'in line' on the web page itself. Select No, to have a button displayed on the field. Clicking this button will display the CAD viewer drawing.
Only personnel / spaces / workspaces or assets that are linked to a drawing can be displayed.
Only one in-line CAD Viewer is allowed per Self-Service page. |
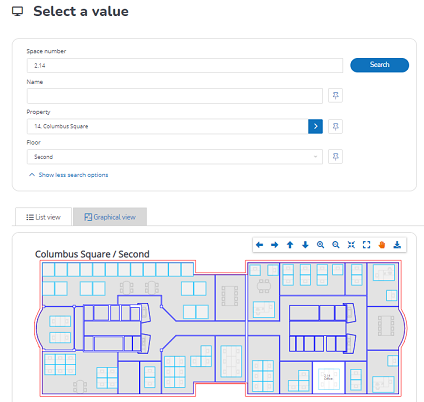
Configuring space selection via CAD Viewer
End users will not always know the number of the space they are looking for, but they may be able to recognize this space on a floor plan. To support this type of search on a web form, for example in the Move request wizard, you can configure the space selectors for CAD Viewer and use them in the Web Configuration forms.
Procedure
1. Go to > .
2. Select the relevant space selector.
3. Go to List block > Actions tab and select the Select from floor plan button.
For the Select from floor plan action to be visible on the List block, make sure that the Floor field is added to the Search block. |
4. At Action properties, select a relevant web definition in the CAD Viewer web definition field.
5. Set the Is visible field to Yes.
Optionally, to the change the order in which different tabs appear (List view or Graphical view), you can set Show as first tab? to Yes to first show the Graphical view.
6. Click Save.
If end users open the Move request wizard to edit the space details for a person or asset, the pop-up in the Space field also displays a Floor plan view (after selecting a floor), next to the List view.
For more information on how the Move request wizard works, see Move request wizard.
For easy identification, non-selectable spaces are shown with a gray overlay. |
Configuring workspace selection via CAD Viewer
End users will not always know the number of the workspace they are looking for, but they may be able to recognize this workspace on a floor plan. To support this type of search on a web form, for example in the Move request wizard, you can configure the workspace selectors for CAD Viewer and use them in the Web Configuration forms.
Procedure
1. Go to > .
2. Select the relevant workspace selector.
3. Go to List block > Actions tab and select the Select from floor plan button.
For the Select from floor plan action to be visible on the List block, make sure that the Floor field is added to the Search block. |
4. At Action properties, select a relevant web definition in the CAD Viewer web definition field.
5. Set the Is visible field to Yes.
Optionally, to the change the order in which different tabs appear (List view or Graphical view), you can set Show as first tab? to Yes to first show the Graphical view.
6. Click Save.
When the end users open the Move request wizard to edit the workspace of the Move line, the pop-up in the Workspace field also displays a Floor plan view (after selecting a floor), next to the List view.
For more information on how the Move request wizard works, see Move request wizard.
Non-selectable workspaces are shown with a gray overlay, for easy identification. |
Configuring autosuggest
If you want to help users to find and select a value quickly, by providing a list of suggestions based on typed-in characters, you can configure autosuggest on fields populated by a selector.
Procedure
1. Go to > .
The following example illustrates how you configure autosuggest by using a selector on the Properties business object.
3. Go to the bottom panel displaying the web definition's structure and click the Autosuggest block.
4. On the data panel, complete the relevant fields. For a description of these fields, refer to Autosuggest fields.
Example:

5. Click Save.
7. Add the following fields:
◦ Description
◦ Property (the Properties selector is selected by default)
8. Save the service request definition.
9. Open the corresponding web form and select some values to view the result:

Configuring context-based filtering
Context fields are used to filter selector results, based on other field values present on the form. For example: filter spaces by a previously selected property.
Procedure
1. On the navigation panel, go to Self-Service modules.
2. Select a module and web definition for which you want to configure context fields.
3. Select the block with the relevant reference field.
4. Select the reference field.
5. On the Context fields tab, select the field(s) to be used as an additional filter. The context field values are passed on to the selector. The selector can use these values as search fields or additional SQL.
For this to work, the search field must be available on the selector. For example, if you want to include a person's property in the Person selector, the search field Property must be available on the selector. |
For more information on configuring context fields in combination with additional SQL, refer to Additional SQL. |
If the selector contains multiple search fields of the same type, only the first search field will be filled with the value of the context field. For example, if the selector contains two Property fields, only the first Property field will be taken into account. When using Context fields in additional SQL, all tags will be replaced with the value of the context field. |
Configuring the automatic completion of fields
Completion fields can be used to automatically populate other fields on a form after selecting a value in a selector. For example: a user selects a space in the Space field (selector) and the Property field is populated with the corresponding value on the form.
Procedure
1. On the navigation panel, go to Self-Service modules.
2. Select a module and web definition for which you want to configure completion fields.
3. Select the block with the relevant reference field.
4. Select the reference field.
5. On the Completion fields tab, select the selector field(s) that should be automatically populated on the form.
If the form contains multiple fields of the same type, only the first field will be filled with the value of the completion field. It is not determined by the translated name or system name of the field. For example, if the form contains two Property fields, the first Property field on the form will be filled.
If you want to fill a specific Property field, make sure that you configure it as the first property field on the form. |