Adding a product store definition
Procedure
1. Go to > .
2. On the action panel, click Add Product store.
3. Enter a Code and Description.
4. Select an Icon and an Image for the product store.
5. Select a Standard product requisition from the list.
6. Click Save.
A Product store web definition with a Products list page, Product details page, and Add, Edit and Details pages is added.
The following setting is available on the Product store web definition:
Requisition policy tab | |
|---|---|
Cancel / change requisition allowed in status(es) | This setting allows users to cancel or change requisitions with a specific status. You can specify here for which statuses you want to permit cancellation or editing. If you do not enter statuses, users are not allowed to change or cancel a requisition at all. |
Configuring a Product details page
On the > , you can configure which product details and stock details are displayed.
From this page, end users can directly add products to their shopping cart and check them out to the Requisition add page.
Procedure
1. Click and open the Products details page tree view.
2. On the Details block, click Add fields to add the fields you want to display on the Product details page. For example, Product size.
3. On the Stock items block, click Add fields to add more fields as required.
4. Click Save.
The Product details page is configured.
Action settings specific to the > tab:
Action | Description |
|---|---|
Shopping cart | This action displays the  icon on the Product details page. The shopping cart also shows the number of added items and the total price of the added products. icon on the Product details page. The shopping cart also shows the number of added items and the total price of the added products.If you selected Yes in the Show price including tax / VAT field on the Products list page, the total price displayed will include tax. If you select No, tax is excluded. |
Check out | This action becomes available on the Products details page if at least one stock item is added to the shopping cart. On clicking Check out button, users are directed to the Add page where they can submit their requisition. |
Back to store | Redirects users to the Products list page. |
Configuring a Products list page
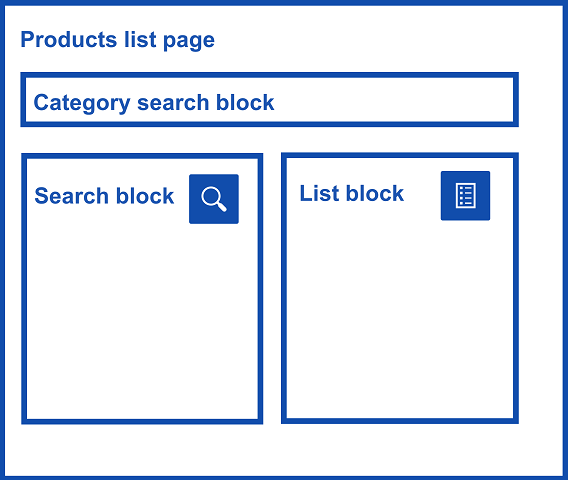
On the Products list page, you can configure a Category search block, Search block and List block.
The following illustration explains the structure of the Products list page as it is displayed to end users.

Procedure
1. Click and open the Products list page tree view.
For information about the Action tab settings, refer to Products list page-Action tab settings. |
2. On the > field, select and add categories from the list.
You can add a maximum of seven main categories to the Products list page and a maximum of 3 levels for the product category structure. If you have added the main product categories, you cannot add the Product group search field in the Search block. |
3. In the Fixed filter field, add a filter for the product categories, if required.
For more information about how end users can search the Product list page, refer to Searching on a Product list page Searching on Products List page. |
4. On the Search block, add the fields based on which the user can search for products in the list. For example, Code, Description.
5. On the List block, click Add fields and add the required fields that must be displayed.
6. On the List fields tab, edit or add fields.
7. Click Save.
A Products list page is created.
Configuring the Add / Edit page
The Add and Edit pages of the Product store web definition have a similar structure. On the Add / Edit page, end users see the products that they added. This page displays the products from the shopping cart as requisition lines.
Procedure
1. Click and expand the Add page or Edit page tree view.
2. On the Requisition lines block, click Add fields to add the fields you want to display on the requisition lines.
3. On the Stock items block, click Add fields and add more fields, as required.
4. On the Add block, configure the general requisition information, such as Requestor, Start date & time and End date & time.
5. Click Add fields / bars to add more fields or bars.
6. Click Save.
The Add page is configured.
Action settings specific to the Requisition lines block Actions tab:
Action | Description |
|---|---|
Add products | Make this button available on the Add / Edit requisition lines page. On clicking this button, users will return to the Products list page where they can add more products. |