Using calendar views in Resource Planner
The top right-hand side of the graphical planner includes several options to change the calendar view:
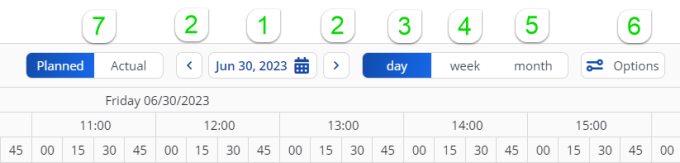
1. Selected day and Date picker - use the date picker to change the view to a different day and display the selected day in the current view.
2. Previous / next - navigate to the day before or the day after the selected date.
3. Day - select this button to show data on the graphical planner for the selected day.
For your convenience during planning, the Day view allows for scrolling to the previous and the next day. This means you can view and 'drag and drop' a work assignment across three days. The Map view will only show data of the selected day in the Day view. |
4. Week - select this button to show data on the graphical planner for seven days, starting from the selected day.
5. Month - select this button to show data on the graphical planner for a month, starting from the selected week.
You can select a calendar view by clicking a relevant option. You can also 'drill-down' from one view to another. Use the procedure below to learn how that works. The procedure starts with the biggest time-unit, Month, and drills down to Day view.
6. > - Activate this option to free up more graphic space for displaying work assignments, resource activities and resource allocations on the planboard and allow relatively less space for displaying non-working time. Be aware that the non-working time is then no longer shown in a realistic proportion.
the Resource allocations feature is licensed separately. See Resource allocations for more information. |
7. Planned vs. Actual - you can toggle between these two views:
a. Planned displays all planned work assignments based on their Planned start date-times and Planned end date-times. Their blocks are displayed on the planboard with an accentuating top line.
b. Actual - recalculates the planboard to show which work assignments are actually in progress, based on Actual start date-times and Actual end date-times. Their blocks are displayed on the planboard without the accentuating top lines.
Procedure
1. In the calendar bar of the graphical planner, select Month.
The calendar displays the current month, starting from the current date.
2. Click on a week number in the header.

The calendar view switches from Month to Week and the first day of the selected week is now the selected day.
3. Click on a day in the header.
The calendar view switches to Day.