Adding resource allocations and resource allocation periods
Resource allocations can be created directly for a resource via the planboard. They can also be added in the Resource allocations TSI.
Procedure
1. On the planboard, click on the time line of the resource for whom you want to add a resource allocation and resource allocation period(s).
2. Drag a bar on the time line representing the resource.
If you intend to plan a resource allocation for a team, drag a bar on the team's time line. See Creating teams and roles for information on how to configure 'team orders' for maintenance teams. See Adding Resource allocations to Teams for more information on adding resource allocations for teams. |
3. Select > from the context menu.
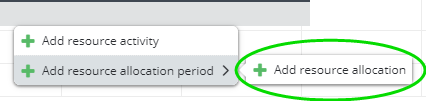
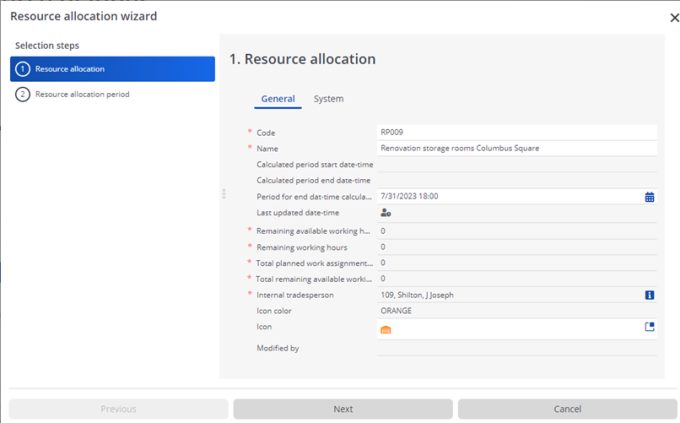
The Resource allocation wizard opens. For the field descriptions, see Resource allocation wizard - fields.
4. At step 1, Resource allocation, enter the required data, such as a Code and Name for the resource allocation.
Notice that the Internal tradesperson field is filled with the name of the selected tradesperson / team.
5. Optionally, select an Icon and icon color.
The color of the icon is also used to color the border of the resource allocation. If no icon and icon color are selected, the default color blue is used for the border.
6. In the Setting for end date-time calculations field fill in the date-time that should be used in the (re)calculations of remaining hours for this resource allocation. This field is not mandatory.
If you fill in a value, you can either enter a fixed date-time or a date-time macro in this field. A date-time macro provides more realistic insight over longer planning periods, as it will only calculate the remaining available hours up to a certain point (defined by the macro), as opposed to a fixed end date-time, which calculates the total remaining hours for the entire resource allocation (past, present and future). |
7. Click Next.
8. At step 2, Resource allocation period, you will see that the start and end date-time of the resource allocation period are pre-populated, but these fields can be edited. The maximum duration of a period is 7 days.
9. Click either Complete to save this single resource allocation and resource allocation period, or Complete and make recurrent to create recurrences of the resource allocation periods within this resource allocation.
10. If you select Complete, you can still create additional resource allocation periods for this resource allocation, by dragging a new bar on the same time line and selecting the existing resource allocation.

Use this option if you do not want to apply recurring patterns for the resource allocation periods, but periods with individual schedules.
11. If you select Complete and make recurrent, create a relevant schedule for the recurrence in the Schedule dialog.
This scheduling action makes repetitive copies of the initial resource allocation period on a daily, weekly or monthly basis.
12. Click OK.
The (recurring) resource allocation periods have been added to the planboard according to the selected schedule. You can now start dragging and dropping unplanned orders onto the resource allocations. When moved to the resource allocation, work assignments are created for this order. You can edit a resource allocation period by right-clicking and selecting Edit resource allocation period from the menu.
To obtain clearer overview of working hours on the planboard, navigate to the top of the screen and select Options. Enable the Compress non-working hours function to display non-working hours in a more concise format. |