Restoring a backup
You can restore a backup from the list of backups available on the gadget.

Procedure
1. Select a backup that you want to restore and click Restore  .
.
 .
.The Restore backup pop-up appears.
2. Click Restore backup.
3. Select the instance (DTAP) the backup should be restored to.
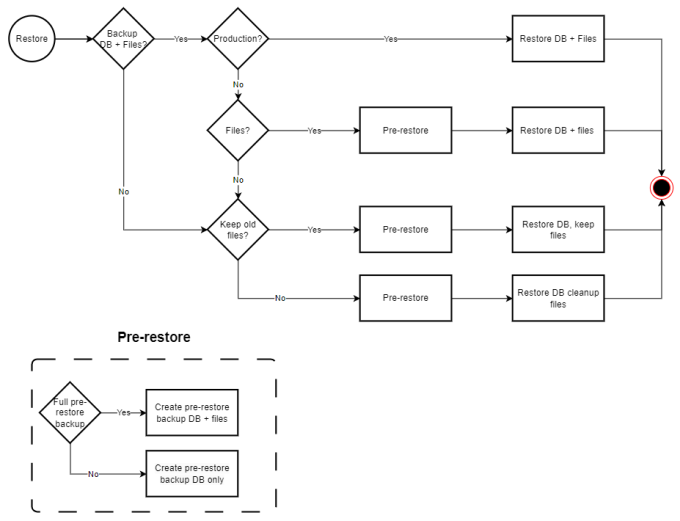
4. If available for the selected instance, you can decide not to include Files in your restore.
If you clear the Files check box, the restore will be much faster because only the database is restored. The files will be purged, when you clear the check box, a warning message will appear to notify you of the impending file purge. |
5. In the Restore all user passwords to the initial password option, select:
◦ Yes, if you want to reset all user passwords to the default password. When logging on, users will be prompted to change their password.
◦ Select No to retain the users' password.
What this means
Suppose you are restoring a backup from PROD to DEV.
Yes: this will reset all the user passwords to the default password of the DEV environment. Users will then be prompted to change their password when logging into DEV for the first time after the restore.
No: the passwords which are currently in PROD will remain and the user would use their PROD password to log in to DEV once the restore is completed.
If Single Sign-On (SSO) is enabled in the Production environment, but the database is restored to a Development environment where SSO is not active, users will not be able to log in using SSO. In that case, they need to use their Planon database passwords — which they may not know. To prevent access issues, make sure you can log in with the supervisor accounts in both the Production and Development environments before restoring the database. |
6. Click Restore backup to complete the process.
While the backup restore is in progress, access to the environment where the backup is restored to is disabled. |
Restoring an environment
What happens when restoring an environment?
1. Typically, when you restore a Production environment to D, T, or A, all scheduled events are disabled:
◦ Platform apps
If you restore a backup to a production environment, active apps will not be deactivated. They will retain their 'Active' status. |
◦ TMS
◦ Scheduled tasks
◦ Access keys
The access key used to encrypt and decrypt passwords for connections to external systems, such as WebDAV, Connect for AutoCAD, Connect for Calendars (C4C), and default user passwords, is unique per installation. This prevents interference from DTA to Prod. Consequently, you need to re-enter passwords if you restore Prod to DTA.
Disabling these events is done to ensure that Production data is not compromised.
However, a second verification takes place.
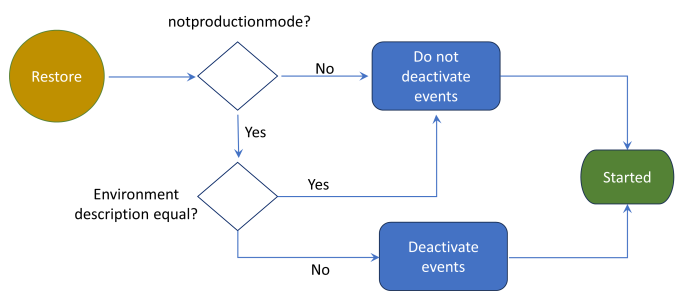
2. When restoring an environment in D, T, or A, the Environment description is verified.
◦ If the Environment mode is not production and if the Environment description is equal, the events are not deactivated.
This implies that for the sake of convenience, these events persist and remain functional even after actions such as restarting, rebuilding, restoring, or upgrading the system.
When restoring an environment with the same environment mode from another URL (environment name differs), the apps are set to Inactive. |
◦ If the Environment mode is not production and if the Environment description is not equal, the events are deactivated.
Graphically, this is illustrated as follows:

In a table, this is illustrated as follows:
Restore | notproductionmode | notproductionmode description | Deactivate? |
|---|---|---|---|
Backup to Production | No | Equal | No |
Backup to Production | No | No equal | No |
Backup to DTA | Yes | Equal | No |
Backup to DTA | Yes | Not equal | Yes |
Restoring files from a backup
You can restore a specific set of files, for example when a WebDAV file has been overwritten with a wrong version.
Procedure
1. Select the backup that contains the working version of your file and click the  button. The Download a backup pop-up appears.
 button. The Download a backup pop-up appears.
2. Click Prepare: Download files. The pop-up closes. The status will show Conversion requested.
3. After a few minutes refresh the page and wait until the status changes to Finished.
4. Click the  button and click Download files to download a zip archive containing your files.
 button and click Download files to download a zip archive containing your files.
Other backup settings
Field | Description | ||
|---|---|---|---|
Retention period (in days) |
For each environment there is an allowed minimum number of retention period: • Development - 1 day • Test - 1 day • Acceptance - 1 day • Production - 7 days | ||
Save disk space | Select the Save disk space check box to enable incremental backups. This splits backups into smaller chunks during the backup process to save lot disk space.
|
Always click Save backup settings to save your changes.
Frequently asked questions
The following list provides an overview of Frequently Asked Questions.
Question | Answer |
|---|---|
File settings are copied over automatically, which is good to know. These need to be set back to the URL for the Acceptance environment. Is that a manual change that needs to be done afterwards? | All file locations/configurations are set correctly for the specific environment. Cloud takes care of all the configuration. The Enterprise Talk locations will have the values as specified in the Environment delivery information for that specific environment, the same for Web configuration. Regarding URLs, no manual action is required after restoring a backup. |
Will the 'Acceptance icon' at the top of the screen be replaced by a DB restore from Production, and be replaced by a different icon and name? | The Acceptance environment will always have Acceptance icon at the top of the screen. Test and Development each have their own icons, no matter what backup you restore. Your Production environment will not display an icon. |