Creating a customized worker
• Creating customized workers requires specific Java knowledge.
• Use an Eclipse environment to build a worker bundle.
Create a new OSGI Plug-in project from the API JAR. |
Planon ProCenter provides key interfaces that enable users to develop an import/export worker bundle. By using the interfaces provided by Planon ProCenter , the user is able to bring about the desired functionality. The interfaces for developing such workers are shipped as JAR archives to the end user who wants to develop the import/export worker.
The customized workers are plugged into Planon ProCenter as a worker bundle. This allows the user to develop and upgrade workers on the fly and deploy them on the application without causing any disturbance.
The following steps provide an overview of how to develop an import/export worker in Eclipse.
To compile your client extension, the worker APIs should be a bundle in your Eclipse workspace before creating an import/ export worker bundle. For this, import the PnImportExportWorker.jar file as a plug-in in the workspace first. This file is located in the ..\Distribution\ImportExportWorker folder.
Procedure
1. In Eclipse, click File > New Project. The New Project dialog box appears.
2. Expand Plug-in Development folder and select Plug-in from existing jar archives.
3. Click Next and, in the next dialog box, click Add and point to the PnImportExportWorker.jar file.
4. Click Next and provide a project name.
5. Click Finish to complete the setup. Your workspace is now ready to develop import/export workers. Now, you are ready to create a new Worker OSGI Plug-in.
6. In Eclipse, in the new workspace that is created, create a new Plug-in project. In the New Plug-in Project dialog box, enter a name and select (OSGI framework) Equinox as the target platform.
For the purpose of this procedure, the name ExampleWorker is used. |
7. Click Next and then click Finish. Now, the skeleton bundle is created with the activator for the bundle in place. Next, modify the manifest.mf file to refer to the required packages.
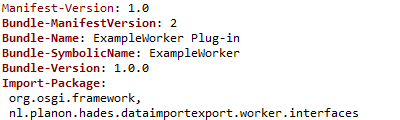
8. Open the manifest.mf file. This file is in the same location as is your project.
In the import package, include the following package.
nl.planon.hades.dataimportexport.worker.interfaces
Your manifest.mf should resemble the following sample:
The examples used here are simplified by excluding the Import-Package versions. It is recommended to version the imports with the compatible version range of the import. This will help in detecting compatibility of the workers, when an upgrade has been performed. |
9. The next step is to create the Worker class. To do so, extend the IImportExportWorker interface and create a class.
Here the class is named as ExampleWorker. Override the methods according to the required functionality.
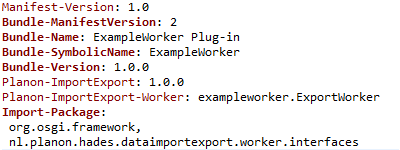
Include the magic header lines in the Manifest file. This is required, because Planon provides the user with a generic Activator and Factory classes for the import/export functionality. This frees the developer from writing his/her own Activator.
In the Manifest file, under Bundle-RequiredExecutionEnvironment, include the following lines.
Planon-ImportExport: 1.0.0
Planon-ImportExport-Worker: exampleworker.ExportWorker
Planon-ImportExport-Worker: exampleworker.ExportWorker
The first line should remain as is. The second line should have the fully qualified name of the worker as header value.
Your manifest.mf should resemble the following sample:
10. The next step is to build and deploy the developed code as a bundle. In Eclipse, right-click the developed project, and select Export.
Choose Plug-in-development.
In the next screen, select your bundle and specify the location where this has to be installed.
Now your bundle is ready.
Copy the generated .jar file to the following location: “<Applicationserver>\server\default\bundles\planon”.
Now you have deployed your bundle.
All that remains is to configure the worker in Planon ProCenter .
In Enterprise Talk, create a new worker, specify the sequence where it has to execute, and enter the fully qualified name of the Worker developed as plug-in name.
For additional information, see the Java Doc. |