Configuring Keycloak
The following Keycloak configuration is an example only. No rights can be derived. Screenshots and example may differ from your situation. If you need assistance in setting up your local specific configuration of keycloack, please contact your account manager. |
Take the following steps to configure Keycloak.
1. In the menu on the left panel, select Identity Providers (IdP).
2. Select SAML in the list to modify the preconfigured settings.
3. Modify the details in the data section, you can configure the settings here (the Redirect URI is automatically set for you):

4. The information for the fields under SAML Config need to be provided by the customer.
These are the details of the Identity Provider (IDP) on the Production environments (and recommended on Non-Production environments):
◦ Want Assertions Signed must be ON
◦ Validate Signature must be ON.
5. Click Save to add the configuration to the Identity Broker solution.
6. Click the Mappers tab. Click on attributetoplanon.
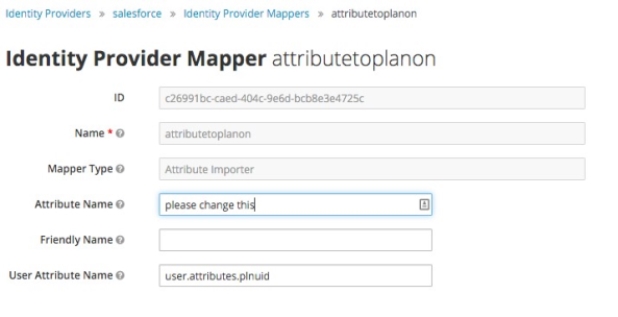
7. Modify the Attribute Name with the correct IDP SAML attribute.
This will also be provided by the customer.
Do not fill the field Friendly Name and do not modify the field User Attribute Name.
8. Click Save to activate the updated attribute mapper to the configuration.
Replacing the certificate
For enhanced control over their own Cloud environments, customers can further tweak single-sign-on configuration.
The following Keycloak configuration is an example only. No rights can be derived. Screenshots and example may differ from your situation. If you need assistance in setting up your local specific configuration of keycloack, please contact your account manager. |
1. In the Environment Management gadget > SSO tab, log on to Keycloak by clicking the Identity broker URL.
The Keycloak console appears.
2. In the left panel, select Identity Providers (IdP).
3. Select SAML in the list to modify the preconfigured settings.
4. Create a backup of the data in the fields Single Sign-On Service URL and Validating X509 Certificates.
5. Replace the values in these fields with the Single Sign-On Service URL and X509 Certificate provided by the Identity Provider.
6. Click Save.
The changes are active directly and can be tested immediately. To do this, close the browser completely and open a new session to validate the login.
For more information on configuring Keycloak, see Keycloak's Server Administration Guide. |
Rollback
Should the credentials provided in the fields Single Sign-On Service URL and Validating X509 Certificates not function correctly for any reason and the previous values need to be reinstated, replace the values with those you backed up earlier. This will reactivate the former settings.
Rearranging the mappers
After configuring the identity provider, please make sure the mappers for the Planon client are in the correct order.
To find and check the current order of mappers, proceed as follows:
1. Click on Clients in the left panel, and click on the Planon client.
2. Open the Mappers tab, and make sure the order is:
◦ username
◦ plnuid
Example

If these mappers are not in the correct order, delete and recreate them in the correct order. (You may need to do this a couple of times to get it right).
Service Provider metadata
The following Keycloak configuration is an example only. No rights can be derived. Screenshots and example may differ from your situation. If you need assistance in setting up your local specific configuration of keycloack, please contact your account manager. |
You must also send some details on SSO - the Service Provider Metadata - to the customer. If there are any configuration changes in the metadata, they can be exported via the Identity Broker solution.
1. In the menu on the left panel, select Identity Providers (IDP).
2. Select the Identity Provider just created.
3. Click the link in the Endpoints field.
It may not directly be apparent that this is a link, but if you hover over the field, the URL will be displayed at the bottom of your browser.

Clicking the link opens the metadata page in your browser:

4. Share this URL with the customer IDP administrator to establish a trusted relation between IDP and the Service Provider.
If the logon page is enabled, you can still automatically be redirected to the desired IDP by adding the following parameters to the URL:
?kc_idp_hint=<IDP Alias>
Example
https://customer-prod.planoncloud.com/?kc_idp_hint=saml
If a redirect to the default IDP is enabled, you can go to the login page by entering a different value.
Example
Custom domain allowance
When adding a custom domain to your Planon Cloud environment additional configuration needs to be done in Keycloak to be able to use Planon via the custom domain in combination with Single Sign on.
Take the follow steps to configure Keycloak.
Procedure
1. In the menu on the left panel select Clients.
2. In the list that is displayed, select Client ID Planon.
3. Add the Custom Domain URL in the Valid Redirect URIs by typing the URL followed by /*

4. Click Save to add the redirect URL.
Logging out of Planon Cloud
This URL makes a user log off from Planon, sends a log off request to the Identity Broker solution and redirects the user to the given redirect URL.
The redirect URL must be configured in Identity Broker solution.
Procedure
1. Login to the Identity Broker solution.
2. On the left side, select Clients.
3. Select Planon.
4. Add the value of the redirect URL in the Valid Redirect URIs by typing the URL followed by /*

5. Click Save to add the redirect URL.
Note that logging out of Planon Cloud but not from IDP only works if you do not configure a Single Logout Service URL on the Identity Provider page. |