Environment Management Gadget
On the SSO tab, you can make various settings relevant to authentication as explained in the following topics.
SSO
When you are enabling SSO and click the tab for the first time, only a button is displayed indicating that the single-sign-on realm is Off.
| A realm is used to manage a set of users, credentials, roles, and groups. A user belongs to and logs into a realm. Realms are isolated from one another and can only manage and authenticate the users that they control. |
Consequently, you first need to create a realm.
1. Click the Off button.
A warning message appears asking you to confirm enabling SSO.
2. Click Enable SSO realm.
The log in credentials appear (user name & password).
3. Store these credentials safely for later use. When this is done, select the check box and click Continue.
| If you misplace the credentials, you can reset the admin password here. |
Your Keycloak environment is created, the login URL is displayed. You have finished creating the realm. Now, you can enable SSO.
4. In 3. Single-sign on is currently, click the Off button to enable SSO.
| A warning message appears. Read it carefully - restarting your environment may have some serious implications. |
5. It is possible to switch the authentication method of the Connect for Analytics solution to OpenID Connect authentication.
Additional configuration of your BI Tool is required, for more information please contact Planon Support.
6. It is possible to switch the SDK authentication method to OpenID Connect authentication.
Additional configuration is required, for more information please see
OpenID Connect.
7. It is possible to switch the authentication method of WebDAV to OpenID connect authentication.
8. It is possible to switch the authentication method for Mobile to OpenID connect authentication.
9. Click Save & rebuild.
You have enabled SSO.
| If you later disable SSO, the configuration will remain, but will be hidden. |
OpenID Connect
It is possible to switch the Planon SDK to OpenID Connect (OIDC) authentication in the Environment management gadget.
| This will currently break the Planon AutoCAD Plugin implementation, so if the Planon AutoCAD Plugin integration is used, do not switch your enviroment to OIDC authentication. This will be fixed in a newer version of Planon so that the Planon AutoCAD Plugin will support OpenID Connect in the near future. |
The default behavior of the SDK is unchanged, this means if no additional configuration is done, form authentication and Planon access key is present.
Enabling OpenID connect disables form authentication. Planon Access key is optional supported in combination with OIDC, or Planon Access Key only. For more information, see the following table:
| Form Authentication | Planon Access Key | OpenID Connect |
---|
Option 1 (default) | Enabled | Enabled | Disabled |
Option 2 | Disabled | Enabled | Enabled |
Option 3 | Disabled | Disabled | Enabled |
Option 4 | Disabled | Enabled | Disabled |
Installation
Planon Cloud configuration
1. Enable OpenID Connect authentication for SDK in the Environment Management gadget.
| In order to see this option, your environment must be running on the latest Cloud platform and SSO must be enabled. |
2. In Keycloak, create a client with a self chosen client name (in the following image: sdk-example1. The root URL should be equal to the SDK interface URL.
3. In the next screen, configure the client to meet up to your security policies and save the changes.
| ••• Both Client credentials as well as Authorization code flow are supported.
••• When using Client credentials flow make sure that Service account is enabled. |
4. In Planon make sure a user is present that can be used by the configured client above. When Client Credentials flow is used, a service account user for the client must be present in Planon.
Example
If the client name is sdk-example1, than a user with the account name service-account-sdk-example1 must be present and active in the Planon application.
Usage
To get access to the SDK service via OpenID Connect, take the following steps:
1. Retrieve an access token at the keycloak service via the Client created in the installation step.
2. Send this token as Bearer token to the Planon SDK service.
Troubleshooting
The following table lists a few common errors.
Error | Description |
---|
401 Unauthorized | Either no access token or an expired access token has been sent to the Planon application. |
500 Internal error | The user account does not exist in the Planon application. |
WebDAV
When enabling OpenID connect for WebDAV, in addition to the configuration mentioned in this article, you must also assign product definitions to the proper user groups.
When using Basic authentication, you can log on to the various WebDAV locations by using your environment's credentials.
After enabling OpenID connect for WebDAV, these credentials will no longer work. Instead, please assign the various product definitions for WebDAV to the relevant user groups.
The following WebDAV product definitions will be available:
• WebDAV
• WebDAV_Audit
• WebDAV_Backup
• WebDAV_PEET
• WebDAV_TMS
• WebDAV_Webservices
These product definitions will enable you to determine/authorize access to the various WebDAV locations.
| Please note that assigning a WebDAV product definition to a user group is explicit. Without assigning WebDAV product definitions, no user can access WebDAV locations! See also: Arranging access to Planon products and subsequent articles. |
Mobile
The Planon Live app will use offline tokens when OIDC has been enabled. The advantage of using offline tokens is that users need to authenticate a lot less.
Default behavior is that after initial log in, a user can use the app without further authentication once per 30 days. If the user uses the app at least once per 29 days he/she can use the app without re-authentication for maximum 180 days (from the initial log in).
If an administrator wants to change the default timings, this is configured in the Identity Broker environment under Clients / PlanonMobile / Advanced Settings.
• Client Offline Session Idle = 30 days (default)
• Client Offline Session Max = 180 days (default)
| Please make sure the Offline Session times are always longer than 1 hour!! If set to a shorter timing unexpected behavior will occur. |
Privacy sandbox compatibility
As of version L99, Planon provides the feature of Privacy sandbox compatibility. This feature ensures that your Planon cloud environment is compliant with upcoming deprecation of third party cookie support by Google (see
Privacy Sandbox for the Web for more information).
• For environments enabling SSO the very first time, this feature is by default enabled.
• For existing customers already using SSO, additional configuration is required before this option can be enabled.
Prerequisites
The configuration of the Identity Provider (IDP) needs to be modified before you can enable this setting. Kindly request your IT organization to expand the current SSO configuration (configuration of your external Identity Provider (IDP)) for your Planon environment.
Request to add two additional redirect URLs alongside the existing allowed redirect URL.
• The first URL should be identical to the existing URL, but without the "-sso" part in the hostname.
• The second URL should be customized to match your custom domain (if no custom domain is configured, only the first additional URL is needed).
Example
Current redirect URL in the IDP configuration:
https://customerenvironment-prod-sso.planoncloud.com/auth/realms/planon/broker/saml/endpoint
First redirect URL to be added:
https://customerenvironment-prod.planoncloud.com/auth/realms/planon/broker/saml/endpoint
Optional, when a custom domain is configured (custom domain used in this example is facilities.customer.com):
https://facilities.customer.com/auth/realms/planon/broker/saml/endpoint
After the IT department confirmed the requested change, you can proceed.
Configuration
1. Enable the setting in the Environment Management gadget > SSO tab under the Privacy sandbox compatibility option by clicking the OFF button.
2. A pop-up will appear. Click Restart Instance’ to restart the environment.
| It is crucial that you log on to the Planon application and access the Environment Management Gadget within 10 minutes after the environment restarts. Always Log on to your environment via Single Sign On (not as supervisor). |
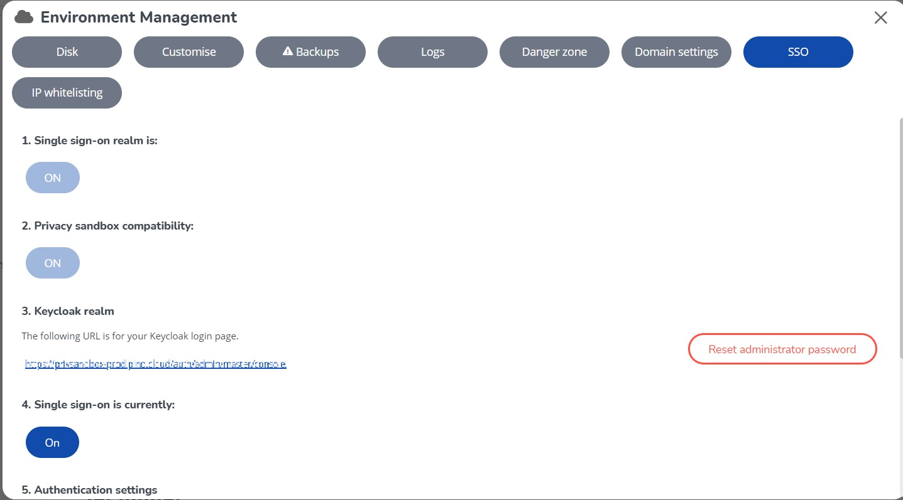
On the SSO tab, please verify that the change has been successfully implemented. If the confirmation is not confirmed within 10 minutes after the environment has restarted, the environment will restart for a second time and the change will be reverted. This step is essential to prevent any configuration errors resulting in making the Planon Cloud environment unusable.
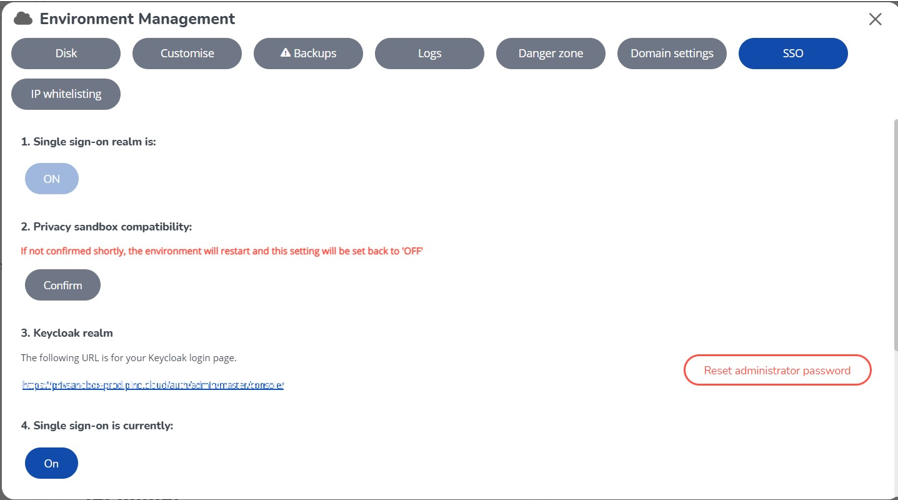
| After confirmation, please be aware that the option will be permanently enabled and cannot be disabled. Note: the improved feature Activate Privacy Sandbox will automatically be enabled when Privacy Sandbox Compatibility is confirmed. |
4. If a logoff URL is set for the environment, ensure it is updated to reflect the changes made.
If a custom domain is not used, remove the "-sso" part from the URL.
If a custom domain is configured, adjust the hostname to match the custom domain.
By following these steps, your Planon Cloud environment is future-proofed for the phasing out of third-party cookies.