Configuration
The following section describes how to configure SSO for Planon Cloud.
Using SAML
The following sections describe how to configure SAML SSO.
The Planon identity broker solution
Planon Cloud supports Single Sign On (SSO) based on SAML2, a process that allows users to authenticate themselves against an external customer side Identity Provider (IdP) rather than obtaining and using a separate user name and password handled by Planon Cloud.
Currently, only Service Provider initiated SSO is supported in the Planon Cloud.
To enable the customer to configure the SSO setup, Planon Cloud introduces an Identity Broker solution. The login information for this Identity broker solution will be provided to you by your Planon contact person.
For each Planon Cloud environment (Development, Test, Acceptance, Production), a separate Identity Broker solution is available.
The SSO feature is provided as a self service.
The customer can turn off/on and configure this feature at will. Planon recommends to check with a consultant /ICC person.
The SSO flow
A Single-Sign-On-enabled Planon Cloud environment consists of various components.
End user
Planon Cloud environment
Identity Broker solution
Customer Identity Provider (IdP)
The following image describes the connection between these various components in Planon Cloud:
Schematic overview of how a user's identity in the Cloud is established
The numbers in the diagram correspond with the steps below.
* 
In this process, the end user is a browser.
Only a few of these actions will result in something that an actual end user will see. These steps are marked with an * and a short explanation is given on what the end user could experience.
1. End users request a resource from the Planon Cloud The service provider performs a security check on behalf of the target resource. (If a valid security context at the Identity Broker (service provider) already exists, skip steps 2–9).
End user experience: enter the Planon URL in the browser or click on a link that points to the Planon Cloud.
2. Planon Cloud Environment responds with a redirect to the Identity Broker solution.
3. End user requests login Identity Broker solution*.
End user experience: If manual login is enabled (default for all non-Prod environments), all users are moved to KeyCloak automatically and can be used to login. The user can click on the link to be redirected to IDP (step 4). If SAML Identity Provider is the default login method, the user is automatically redirected to IDP (step 4).
4. The Identity Broker responds with a redirect to the Identity Provider.
5. The end user requests login from the Identity Provider*.
End user experience: User views the login page or is automatically logged in to the Identity Provider, depending on the configuration at the customer.
6. After a successful login at the Identity Provider, the end user is redirected to the Identity Broker.
7. The end user visits the Identity Broker with a SAML post.
8. The Identity Broker responds with a redirect to the Planon Cloud.
9. Post configured attribute to Planon Cloud.
10. Planon Cloud checks if user session is valid at Identity Broker solution.
11. Identity Broker solution confirms, when the session is valid.
12. Only after the valid session confirmation, the user can access the requested resource.
End user experience: The user sees the requested resource at Planon Cloud. If the user name is unknown in the Planon Cloud Environment, an access failed message will be displayed.
Prerequisites - SAML assertion to be sent to Planon
The Identity Broker Solution requires a SAML response that contains the following two components:
A NameID (including a mandatory format description).
A separate SAML attribute that contains the identifier to map to Planon. (so not the NameID itself!)
In the example below, these mandatory components appear in bold.
The following excerpt is an anonymized sample of a SAML post to Planon:
<samlp:Response ID="_0216c6ce-7f8c-4e22-b6ca-d4cb9c6fc431"
InResponseTo="ID_dbe02f23-e90a-4b04-a8ab-8af19632c7b5" Version="2.0"
IssueInstant="2015-09-01T20:55:33.525Z"
Destination="https://xx-yyy.planoncloud.com/"
xmlns:samlp="urn:oasis:names:tc:SAML:2.0:protocol" >
<saml:Issuer
xmlns:saml="urn:oasis:names:tc:SAML:2.0:assertion">urn:xyz:saml:idp</s
aml:Issuer>
<Signature xmlns="http://www.w3.org/2000/09/xmldsig#">
<SignedInfo>
<CanonicalizationMethod
Algorithm="http://www.w3.org/2001/10/xml-exc-c14n#" />
<SignatureMethod Algorithm="http://www.w3.org/2000/09/xmldsig#rsa-sha1"
/>
<Reference URI="#_0216c6ce-7f8c-4e22-b6ca-d4cb9c6fc431">
<Transforms>
<Transform
Algorithm="http://www.w3.org/2000/09/xmldsig#enveloped-signature" />
<Transform Algorithm="http://www.w3.org/2001/10/xml-exc-c14n#">
<InclusiveNamespaces PrefixList="#default samlp saml ds xs xsi"
2001/10/xml-exc-c14n#" />
</Transform>
</Transforms>
<DigestMethod
xmlns="http://www.w3.org/Algorithm="http://www.w3.org/2000/09/xmldsig#sh
a1" />
<DigestValue>WrxQ8DfeSzygwXgKFbLLuK/iPvI=</DigestValue>
</Reference>
</SignedInfo>
<SignatureValue>….</SignatureValue>
<KeyInfo>
<X509Data>
<X509Certificate>…</X509Certificate>
</X509Data>
</KeyInfo>
</Signature>
<samlp:Status>
<samlp:StatusCode Value="urn:oasis:names:tc:SAML:2.0:status:Success" />
</samlp:Status>
<saml:Assertion Version="2.0" ID="_e6db33a1-0724-4474-bdde-a9628e8223e0"
IssueInstant="2015-09-01T20:55:33.525Z"
xmlns:saml="urn:oasis:names:tc:SAML:2.0:assertion">
<saml:Issuer>urn:xyz:saml:idp</saml:Issuer>
<Signature xmlns="http://www.w3.org/2000/09/xmldsig#">
<SignedInfo>
<CanonicalizationMethod
Algorithm="http://www.w3.org/2001/10/xml-exc-c14n#" />
<SignatureMethod Algorithm="http://www.w3.org/2000/09/xmldsig#rsa-sha1"
/>
<Reference URI="#_e6db33a1-0724-4474-bdde-a9628e8223e0">
<Transforms>
<Transform
Algorithm="http://www.w3.org/2000/09/xmldsig#enveloped-signature" />
<Transform Algorithm="http://www.w3.org/2001/10/xml-exc-c14n#">
<InclusiveNamespaces PrefixList="#default saml ds xs xsi"
org/2001/10/xml-exc-c14n#"/>
</Transform>
</Transforms>
<DigestMethod
xmlns="http://www.w3.Algorithm="http://www.w3.org/2000/09/xmldsig#sha1"
/>
<DigestValue>Y1ksPiFQl6Mzh0nJrMNO2OMDtEI=</DigestValue>
</Reference>
</SignedInfo>
<SignatureValue>…</SignatureValue>
<KeyInfo>
<X509Data>
<X509Certificate>…</X509Certificate>
</X509Data>
</KeyInfo>
</Signature>
<saml:Subject>
<saml:NameID Format="urn:oasis:names:tc:SAML:2.0:nameidformat:
persistent">username</saml:NameID>
<saml:SubjectConfirmation
Method="urn:oasis:names:tc:SAML:2.0:cm:bearer">
<saml:SubjectConfirmationData NotOnOrAfter="2015-09- 01T20:58:33.541Z"
Recipient="https://xx-yyy.planoncloud.com/"
InResponseTo="ID_dbe02f23-e90a-4b04-a8ab-8af19632c7b5" />
</saml:SubjectConfirmation>
</saml:Subject>
<saml:Conditions NotBefore="2015-09-01T20:52:33.525Z"
NotOnOrAfter="2015-09-01T20:58:33.525Z">
<saml:AudienceRestriction>
<saml:Audience>https://xxyyy.
planoncloud.com/auth/realms/environment-test</saml:Audience>
</saml:AudienceRestriction>
</saml:Conditions>
<saml:AuthnStatement AuthnInstant="2015-09-01T20:55:33.541Z"
SessionIndex="_e6db33a1-0724-4474-bdde-a9628e8223e0">
<saml:AuthnContext>
<saml:AuthnContextClassRef>urn:oasis:names:tc:SAML:2.0:ac:classes:Passwo
rd</saml:AuthnContextClassRef>
</saml:AuthnContext>
</saml:AuthnStatement>
<saml:AttributeStatement>
<saml:Attribute Name="email">
<saml:AttributeValue
xsi:type="xs:string"xmlns:xs="http://www.w3.org/2001/XMLSchema"xmlns:xsi
="http://www.w3.org/2001/XMLSchema-instance">USERNAME@email.com</saml:At
tributeValue>
</saml:Attribute>
</saml:AttributeStatement>
</saml:Assertion>
For more information on how to check a SAML assertion, please see SSO troubleshooting.
Activating Keycloak
* 
The following Keycloak configuration is an example only. No rights can be derived. Screenshots and example may differ from your situation. If you need assistance in setting up your local specific configuration of keycloack, please contact your account manager.
Take the following steps to activate Keycloak.
1. Turn on SSO by using the Environment Management gadget, save the URL and user name/password.
2. Open the URL saved in step 1 and log in with the initial credentials.
Log in screen
3. At the first login, you will be prompted to complete your profile.
Provide a valid email address. A verification email will be sent to you to enable your account.
Email information
4. You will be prompted to change your password.
* 
You can use the password saved at step 1 as the New Password. This way the password can always be looked up in the Environment Management gadget.
Update password screen
A verification email will be sent to you to the email address you have provided. This email contains an activation link for your account.
Note that the link in this email will expire within 5 minutes.
5. After verifying the email address, you can log in to the Planon Cloud Identity Broker solution.
Confirmation message
Configuring Keycloak
* 
The following Keycloak configuration is an example only. No rights can be derived. Screenshots and example may differ from your situation. If you need assistance in setting up your local specific configuration of keycloack, please contact your account manager.
Take the following steps to configure Keycloak.
1. In the menu on the left panel, select Identity Providers (IdP).
2. Select SAML in the list to modify the preconfigured settings.
3. Modify the details in the data section, you can configure the settings here (the Redirect URI is automatically set for you):
SAML configuration screenSAML configuration screen
4. The information for the fields under SAML Config need to be provided by the customer.
These are the details of the Identity Provider (IDP) on the Production environments (and recommended on Non-Production environments):
Want Assertions Signed must be ON
Validate Signature must be ON.
5. Click Save to add the configuration to the Identity Broker solution.
6. Click the Mappers tab. Click on attributetoplanon.
7. Modify the Attribute Name with the correct IDP SAML attribute.
This will also be provided by the customer.
Do not fill the field Friendly Name and do not modify the field User Attribute Name.
8. Click Save to activate the updated attribute mapper to the configuration.
Replacing the certificate
For enhanced control over their own Cloud environments, customers can further tweak single-sign-on configuration.
* 
The following Keycloak configuration is an example only. No rights can be derived. Screenshots and example may differ from your situation. If you need assistance in setting up your local specific configuration of keycloack, please contact your account manager.
1. In the Environment Management gadget > SSO tab, log on to Keycloak by clicking the Identity broker URL.
The Keycloak console appears.
2. In the left panel, select Identity Providers (IdP).
3. Select SAML in the list to modify the preconfigured settings.
4. Create a backup of the data in the fields Single Sign-On Service URL and Validating X509 Certificates.
5. Replace the values in these fields with the Single Sign-On Service URL and X509 Certificate provided by the Identity Provider.
6. Click Save.
The changes are active directly and can be tested immediately. To do this, close the browser completely and open a new session to validate the login.
* 
For more information on configuring Keycloak, see Keycloak's Server Administration Guide.
Rollback
Should the credentials provided in the fields Single Sign-On Service URL and Validating X509 Certificates not function correctly for any reason and the previous values need to be reinstated, replace the values with those you backed up earlier. This will reactivate the former settings.
Rearranging the mappers
After configuring the identity provider, please make sure the mappers for the Planon client are in the correct order.
To find and check the current order of mappers, proceed as follows:
1. Click on Clients in the left panel, and click on the Planon client.
2. Open the Mappers tab, and make sure the order is:
username
plnuid
Example
Screen capture of the Mappers tabScreen capture of the Mappers tab
If these mappers are not in the correct order, delete and recreate them in the correct order. (You may need to do this a couple of times to get it right).
Service Provider metadata
* 
The following Keycloak configuration is an example only. No rights can be derived. Screenshots and example may differ from your situation. If you need assistance in setting up your local specific configuration of keycloack, please contact your account manager.
You must also send some details on SSO - the Service Provider Metadata - to the customer. If there are any configuration changes in the metadata, they can be exported via the Identity Broker solution.
1. In the menu on the left panel, select Identity Providers (IDP).
2. Select the Identity Provider just created.
3. Click the link in the Endpoints field.
It may not directly be apparent that this is a link, but if you hover over the field, the URL will be displayed at the bottom of your browser.
Endpoints fieldEndpoints field
Clicking the link opens the metadata page in your browser:
4. Share this URL with the customer IDP administrator to establish a trusted relation between IDP and the Service Provider.
If the logon page is enabled, you can still automatically be redirected to the desired IDP by adding the following parameters to the URL:
?kc_idp_hint=<IDP Alias>
Example
https://customer-prod.planoncloud.com/?kc_idp_hint=saml
If a redirect to the default IDP is enabled, you can go to the login page by entering a different value.
Example
Custom domain allowance
When adding a custom domain to your Planon Cloud environment additional configuration needs to be done in Keycloak to be able to use Planon via the custom domain in combination with Single Sign on.
Take the follow steps to configure Keycloak.
Procedure
1. In the menu on the left panel select Clients.
2. In the list that is displayed, select Client ID Planon.
3. Add the Custom Domain URL in the Valid Redirect URIs by typing the URL followed by /*
Adding valid redirect URIsAdding valid redirect URIs
4. Click Save to add the redirect URL.
Logging out of Planon Cloud
This URL makes a user log off from Planon, sends a log off request to the Identity Broker solution and redirects the user to the given redirect URL.
The redirect URL must be configured in Identity Broker solution.
Procedure
1. Login to the Identity Broker solution.
2. On the left side, select Clients.
3. Select Planon.
4. Add the value of the redirect URL in the Valid Redirect URIs by typing the URL followed by /*
Example of the Valid Redirect URI field
5. Click Save to add the redirect URL.
* 
Note that logging out of Planon Cloud but not from IDP only works if you do not configure a Single Logout Service URL on the Identity Provider page.
KeyCloak secure configuration considerations
This section lists a number of security considerations that can enhance your security level when using Planon Single Sign On (SSO).
* 
Please be aware that these configuration settings are considerations that highly depend on the customers' requirements, their Identity Provider and the security policies within the customers' organization. Only IT staff that is trained in these configurations should deploy these considerations or contact Planon for consultancy.
Authentication
External identity provider
When delegating authentication to an external identity provider (IdP) you should consider the following:
Subject
Description
Local account password
When a user logs in using an external identity provider, KeyCloak will create an account in it’s local store.
By default, it is possible for users to set a password on this account and use the user name and the KeyCloak local password to login.
As this bypasses the external identity provider, this may be undesired.
This behavior can be disabled at two places:
Configure > Authentication > Required actions and disable Update password.
When this is disabled, users can no longer set the password on the local KeyCloak account.
Configure > Authentication > Flows > Browser and disable the forms.
When this is disabled, the password screen can no longer be used. Please be aware that this option will also disable all local keycloak accounts just as supervisor.
Forcing external IdP login
What also could be considered is to make the login via an external IdP mandatory in the browser flow by setting the Identity Provider Redirector to required; this way, you cannot authenticate against other sources than your own IdP.
This can be configured by going to:
Configure > Authentication > Browser and configure the Identity Provider Redirector as Required.
Using Planon user federation
It is possible to authenticate using the Planon system as an authentication source. Credentials entered in the KeyCloak user name and password fields are validated against the Planon credential store.
Subject
Description
Local account password
When a user logs in using the Planon user federation, KeyCloak will create an account in it’s local store. By default, it is possible for users to set a password on this account and use the user name and the KeyCloak local password to login. This bypasses the Planon user federation check so this may be undesired.
This can be configured by going to:
Configure > Authentication > Required actions and disable Update password.
When this is disabled, users can no longer set the password on the local KeyCloak account.
KeyCloak local account password
Subject
Description
Password policy
When using the local KeyCloak passwords, it is advised to set a password policy. This can be done in:
Configure > Authentication > Policies > Password policy.
Here, you can add policies for the different aspects of the passwords. Planon recommends setting the password policy in accordance with your organization's security policies.
Brute force protection
Brute force detection will be enabled by default. However, customers can set up their own metrics if desired.
The Brute force detection settings can be found under:
Configure > Realm settings > Security defences > Brute force detection
General settings
Subject
Description
Multi-factor admin
We strongly recommend to set up multi-factor authentication on the admin account. This can be done by:
User name (top right of your screen) > Manage account > Account security > Signing in > Two-factor authentication
Security headers
Customers can set up their own security headers if desired.
The security headers settings can be found under:
Configure > Realm settings > Security defences > Header
Testing the solution
Prerequisite
Ensure that the UID for the test user is present as an account in the Planon Cloud environment for a full working test.
Procedure
1. Visit the main URL of the Planon Cloud environment. The default login page is being replaced by the Identity Broker login page.
For production, the configured IDP will be configured as default and no manual login will be possible. The users will be automatically redirected to the IDP page.
Planon Login screen
2. To check the SSO solution, click on the alias you configured in the Identity Broker (only for environments other than Production).
You will be redirected to the configured IDP and - if authenticated already - automatically logged in.
You will be logged in to Planon with the configured UID (in the example, the user e-mail address). The user's email address displayed as the logged on accountThe user's email address displayed as the logged on account
If you do not see the Planon screen, but an Access denied message, it means that the SSO login was successful but the users UID could not be resolved as a Planon Cloud account.
Access denied message
SSO troubleshooting
For troubleshooting the SSO configuration, Planon recommends to use Mozilla Firefox in combination with the add-on SAML Tracer. This add-on lets you read the messages being sent between the end user (browser), the Identity Broker (Service Provider) and the IDP (Identity provider at customer side).
Make sure the SAML Tracer is enabled when visiting the Planon Cloud environment. All http messages will be recorded. If a message contains a SAML request, it is highlighted and the SAML request can be viewed in the SAML tab. Please ensure that the SAML assertion sent by the Identity Provider meets the prerequisites.
Common issues
No format in NameID
No separate SAML attribute present (this is not needed when the NameID is used as the identifier)
Keycloak
It is possible to configure Keycloak to validate the entered user name and password against the accounts stored in the Planon database.
Having this in place renders a Planon Cloud environment suitable for OpenID Connect authentication without having to use an external authentication source (IDP).
Prerequisites
Before configuring this feature, please note the following requirements:
This feature is currently only available on Planon Cloud environments.
The environment must have Keycloak enabled (SSO tab in the Environment management gadget).
The Planon version L92 or later.
Overview
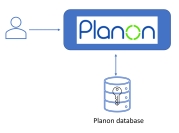
When a Cloud environment is delivered, the following way of authentication is the default configuration.
* 
This configuration is also the default on-premise configuration; it uses form authentication for the Planon environment.
Planon authentication
Keycloak
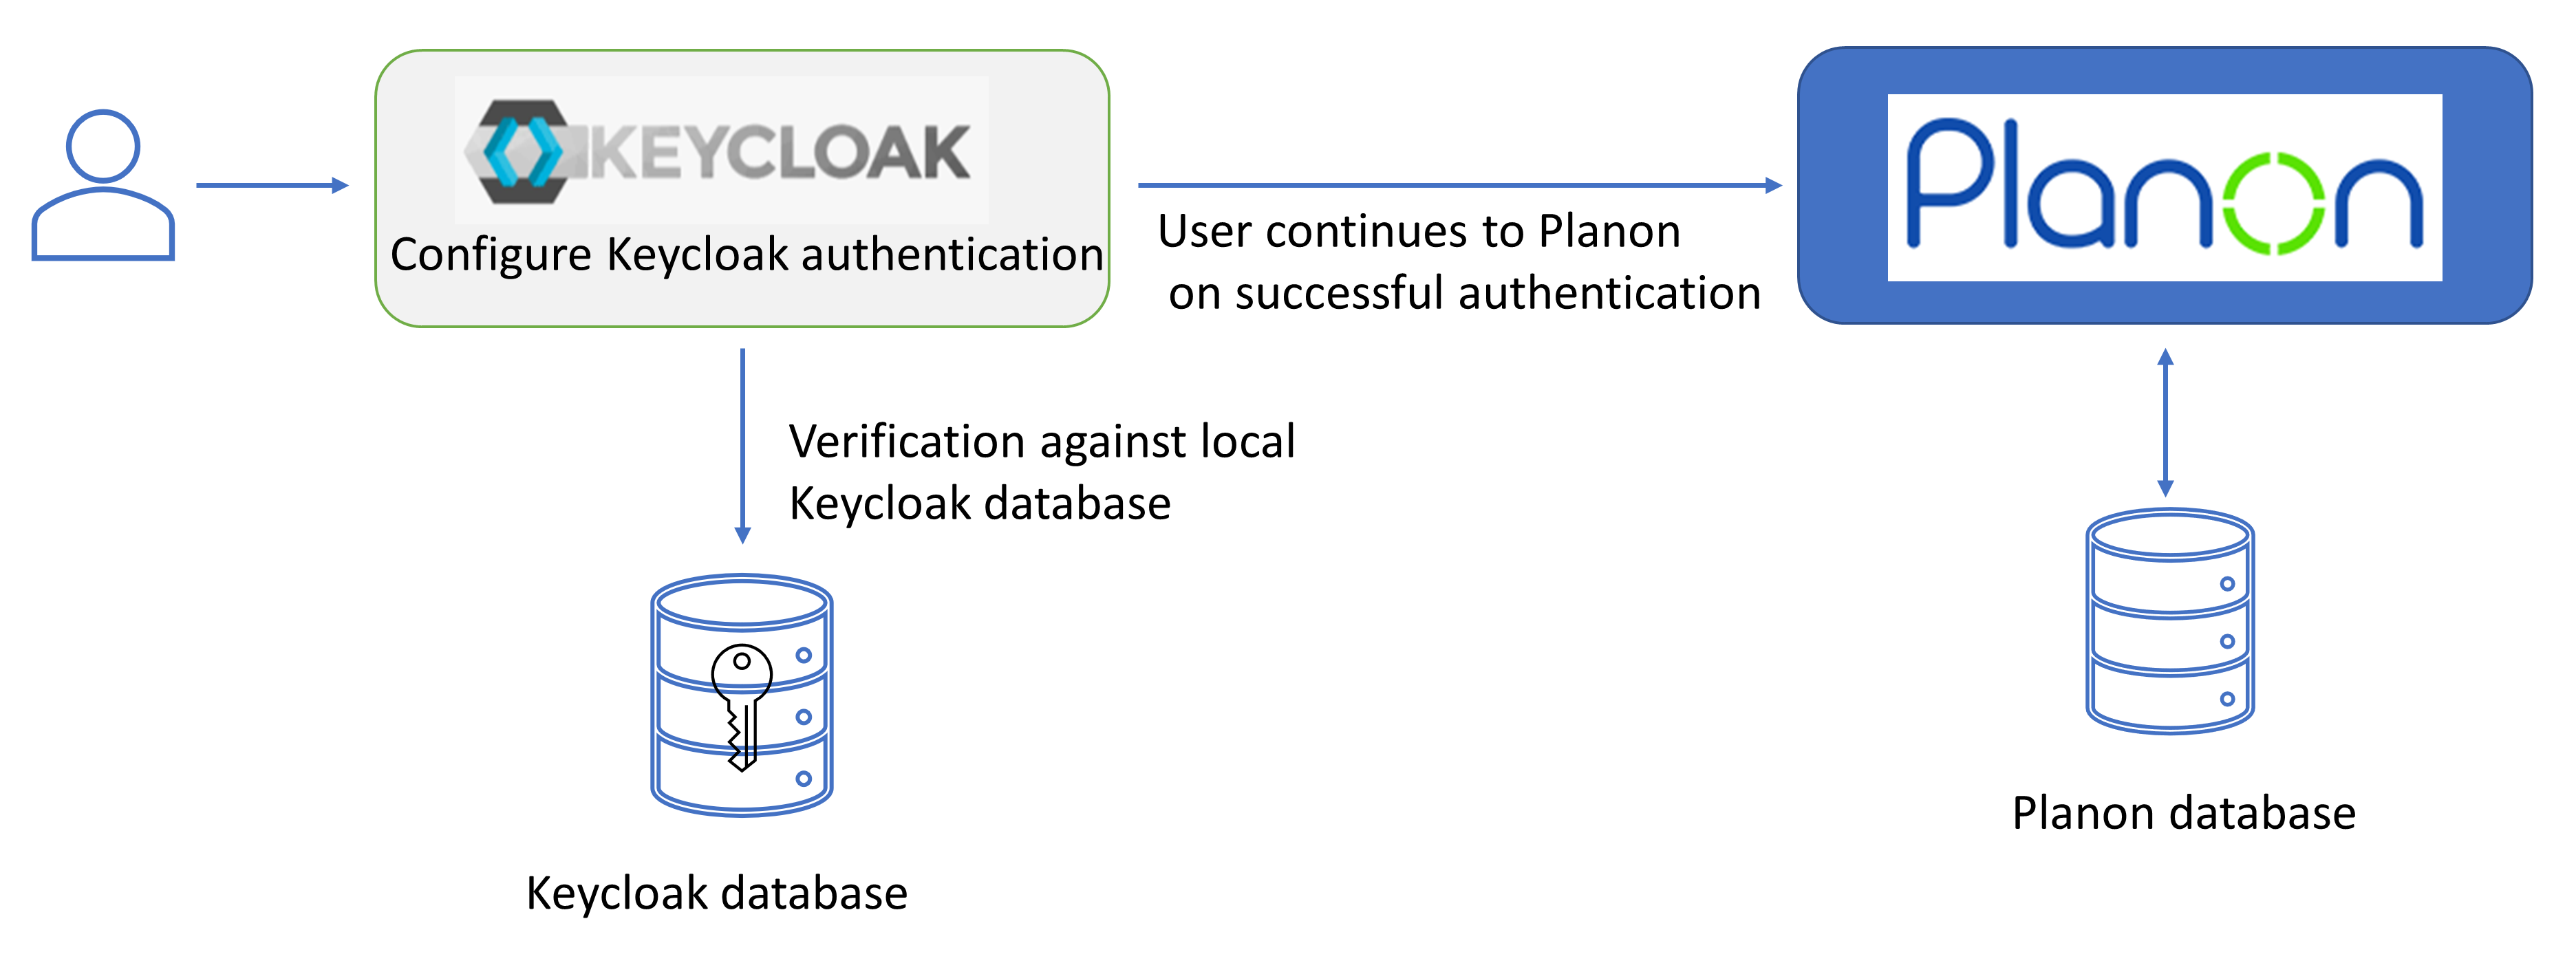
Enabling Single Sign On (SSO) on a Cloud environment introduces Keycloak authentication. Keycloak can be configured to use different authentication sources.
January 1, 2025
On January 1, 2025, Planon User federation will be implemented. Please note that this is release independent (from L92 onwards). By default this automatically applies to newly configured SSO environments.
Planon User federation applies to new and existing customers.
For existing customers who have configured SSO (in the past), nothing will change.
For existing customers who have not yet configured SSO, this will apply.
For new customers, this automatically applies.
What it means:
If a customer is using a Planon environment (L92 or later) and enables SSO (Keycloak) after January 1, 2025, the current user passwords will remain working via the Planon User provider in Keycloak.
Keycloak authentication
By default, the authentication via Keycloak is configured as follows.
* 
This configuration needs to be adjusted by the customer according to the customer's specific (security) requirements. The default configuration already contains all existing users that are able to log in to Planon.
Keycloak authentication
The following diagram shows the possible configuration options for authenticating users.
This includes the configuration that needs to be applied by the customer.
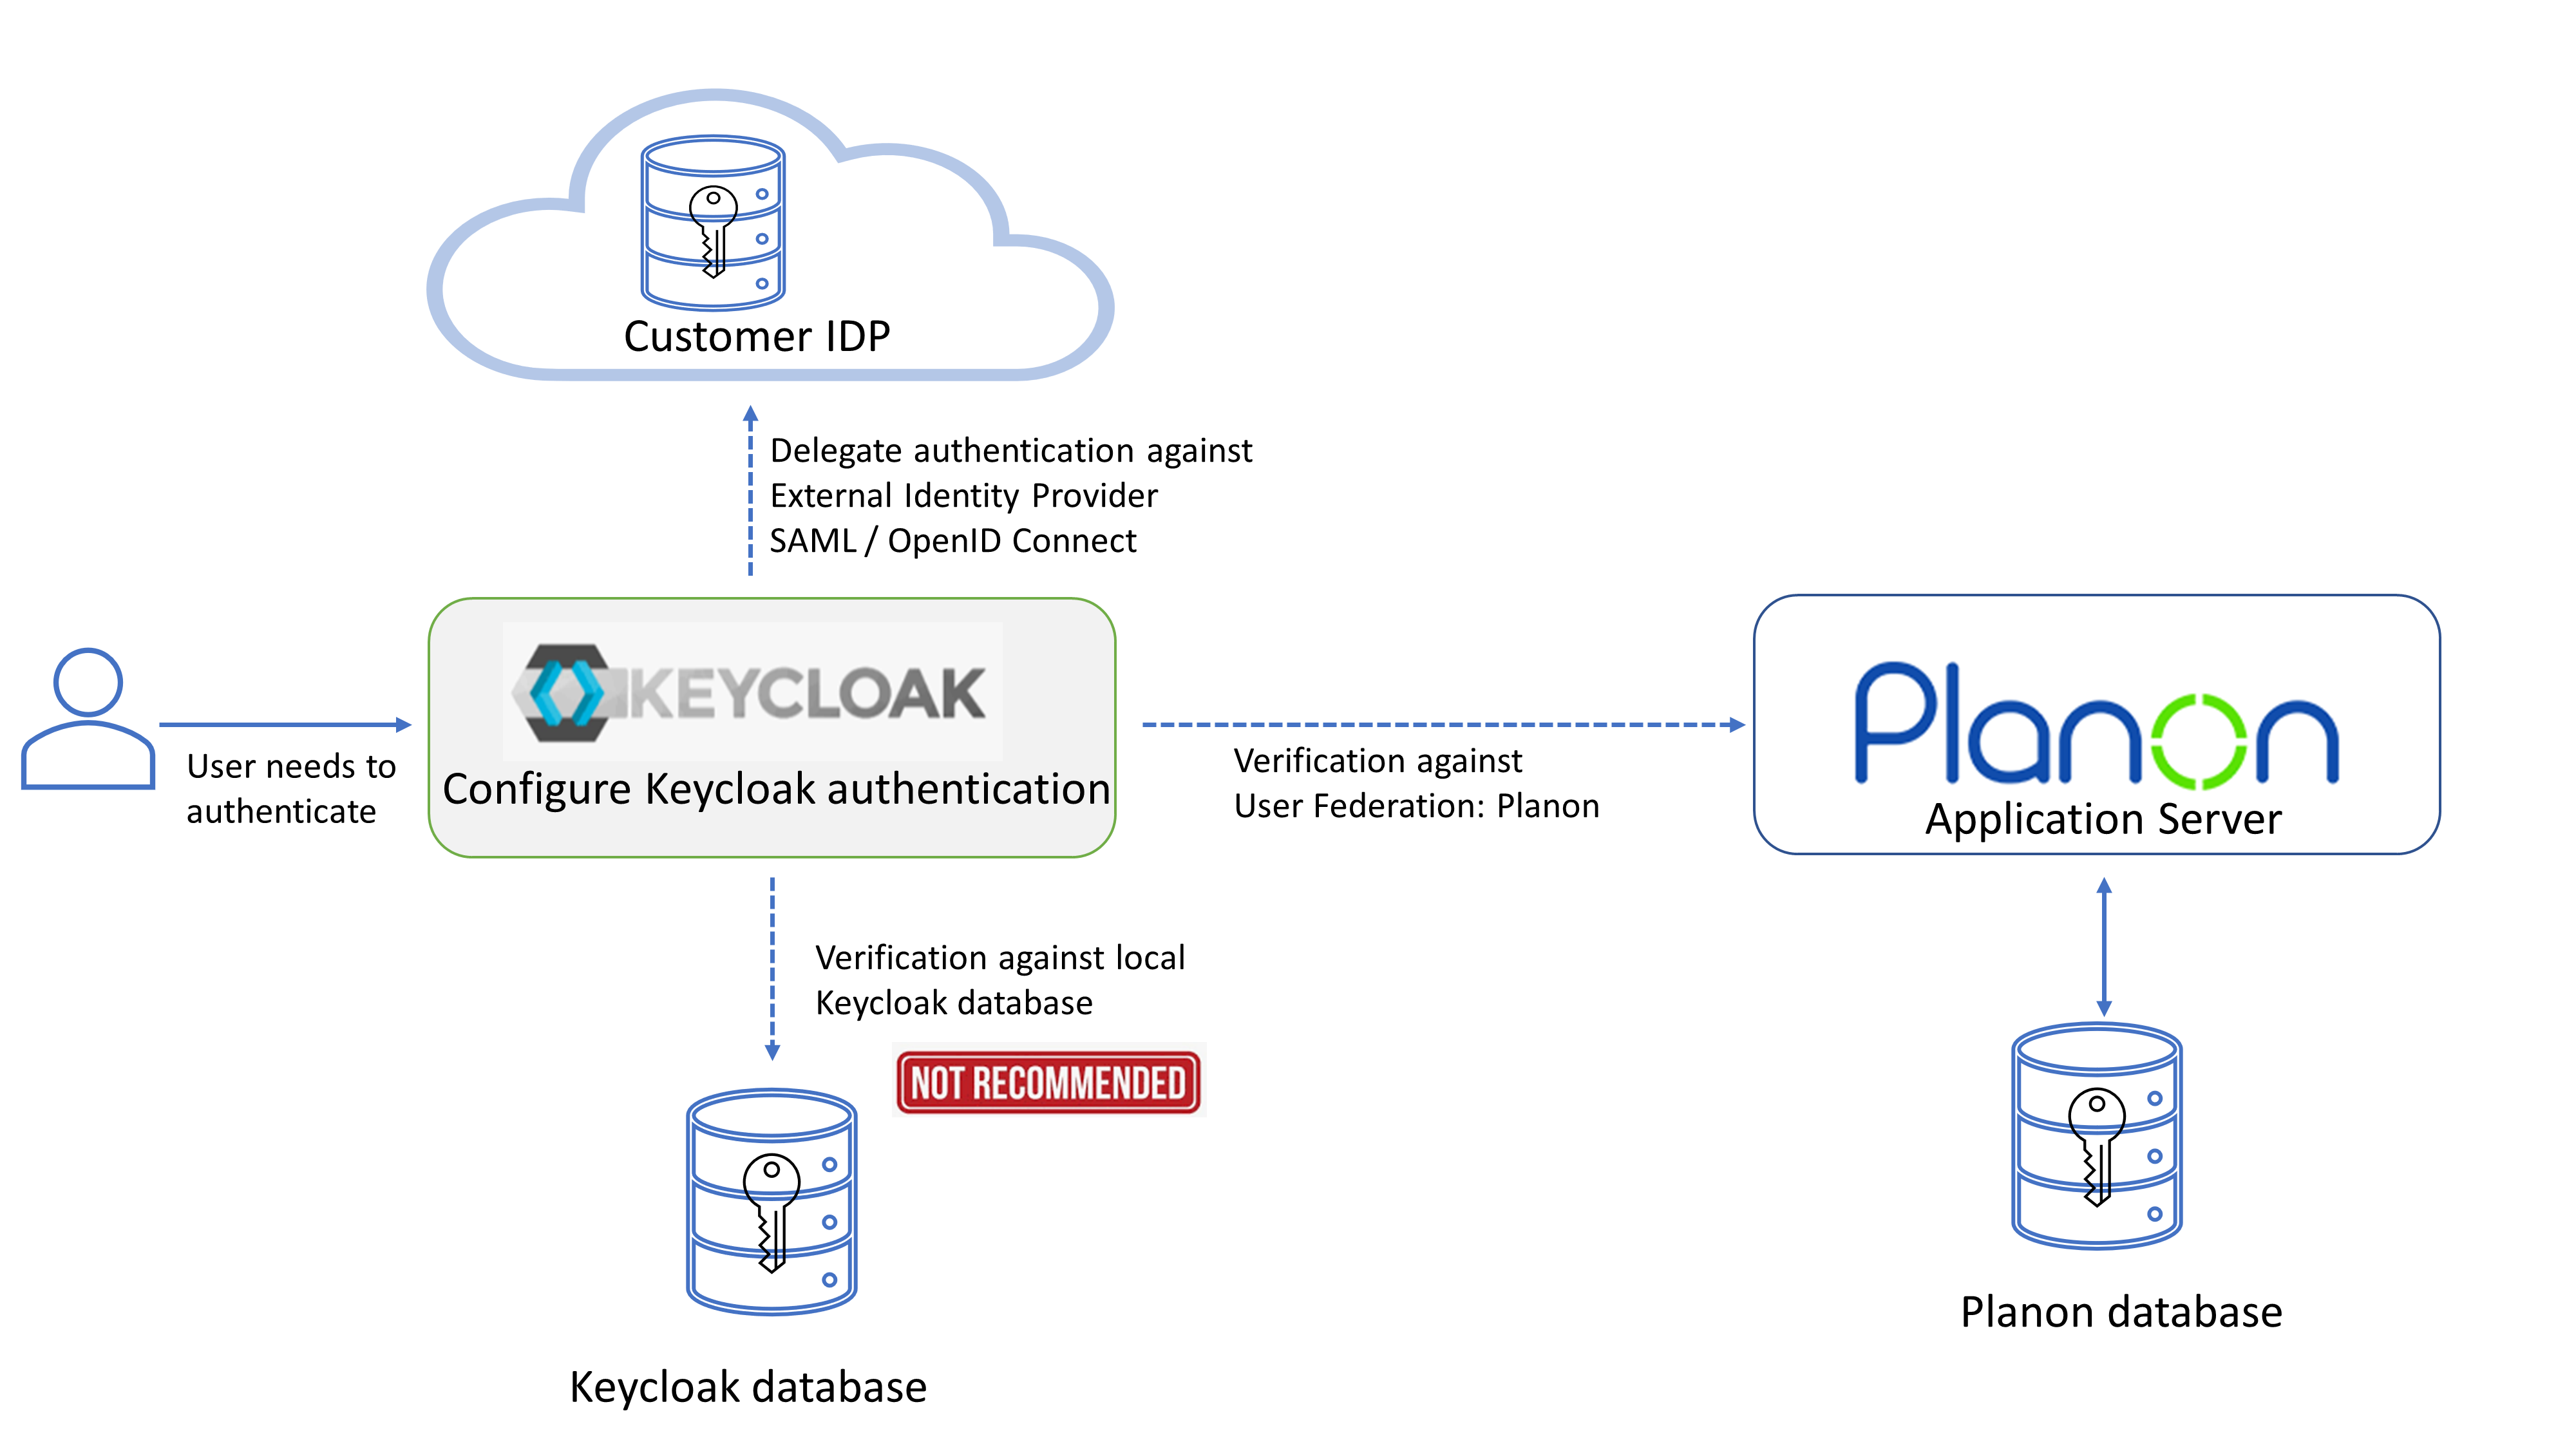
Overview of authentication options
Customer's options
The customer can choose to:
Add accounts to the Keycloak database for users to authenticate against Keycloak.
* 
This is not recommended!
Add Planon provider in Keycloak under User Federation (current out-of-the-box-solution).
This way, users authenticate against the account in Planon database via Keycloak
Add a external IDP under Identity Providers in Keycloak and disable Planon User Federation.
This way, users authenticate only against the external IDP of the customers choice via Keycloak.
* 
This is the recommended solution.
Configuring Planon User federation
Proceed as follows to configure User Federation: Planon.
Procedure
1. Add a Planon provider in the section User Federation of KeyCloak.
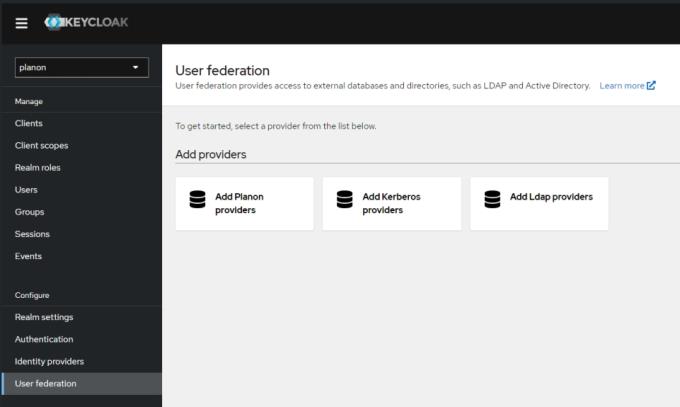
User federationUser federation
2. Fill out the settings.
In a Planon Cloud environment only the Console display name needs to be entered, all other fields are pre-configured.
Most of them are initialized correctly for Cloud environments so they need not be changed.
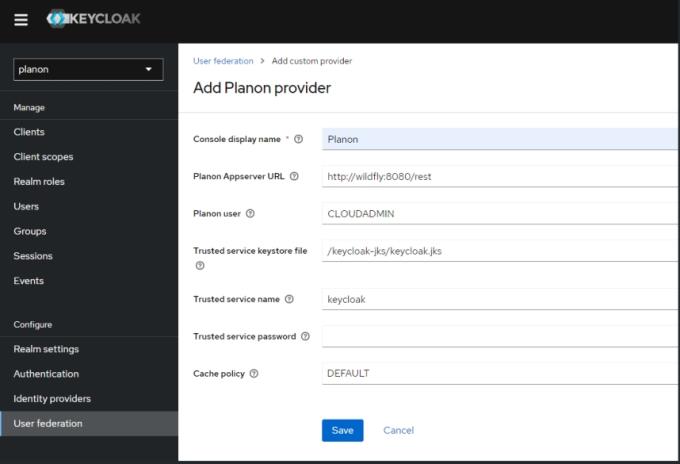
Settings screenSettings screen
The following table provides a description of the required settings:
Field
Description
Console display name
The name of the user federation in the Keycloak configuration.
Planon AppServer URL
The location of the Planon backend that can handle user validation.
For Cloud, the default value is fine.
Planon user
The user that is used to perform queries to the Planon backend. This should be an active user.
Trusted service keystore file
The user federation uses a trust between Keycloak and the Planon backend. This file contains the keys.
For Cloud, you can leave this as is.
Trusted service name
The user federation uses a trust between Keycloak and the Planon backend. This is the name of that trusted service.
For Cloud, you can leave this as is.
Trusted service password
The user federation uses a trust between KeyCloak and the Planon backend. This field can override the password.
For Cloud, you can leave this as is.
Cache policy
Sets the caching policy. Default should be fine.
3. Click Save to apply your settings.
A check with the configured backend is carried out to verify that all configured values are correct. When a mismatch is detected, the save will fail and an error with specific error information will be displayed.
If saving is succesfull, the user federation is activated.
End users can now log in via Keycloak with the user name and password that are stored in the Planon backend.
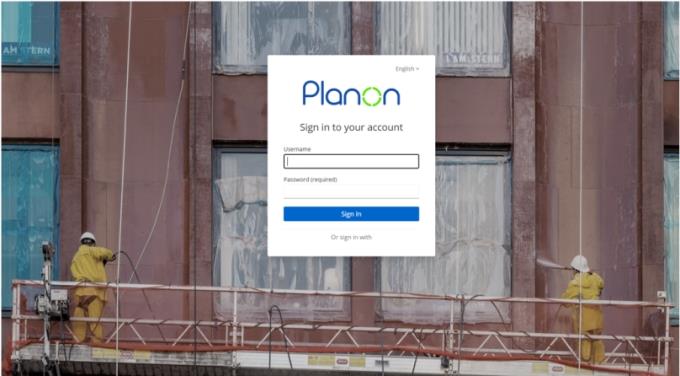
Planon loginPlanon login
* 
Managing users can still be done through the Planon Accounts TSI. For more information, see the Planon Webhelp.
Recommendations
It is not recommended to combine the Planon user federation and Keycloak local password verification. For this reason, we recommend to disable the Update password required action on the authentication section of the Keycloak configuration.
It is recommended to switch to the OpenID Connect authentication method for applications that support this as is described in Planon Webhelp
Limitations
Additional configuration is required to be able to use Planon's Forgotten password functionality together with Planon user federation:
Configuring forgotten password functionality
After configuring Planon Authentication via Keycloak, Planon's Forgotten password functionality will no longer be accessabele via the login screen.
If you want to make the forgotten password functionality available for the end users, please provide a link to reset the forgotten password on a central system of your organization. This link to reset forgotten password is:
Default: https://<cloud name>.planoncloud.com/forgotpassword/page
If a custom domain is configured: https://<custom domain url>/forgotpassword/page
Planon user federation is currently only available on Cloud environments.