Action definition fields
Field | Description | ||
|---|---|---|---|
Code | Enter a code number for the action definition. | ||
Description | Specify a meaningful name for the action definition. | ||
Alert condition | Click the Select a value button to open the Alert condition dialog box. In this dialog box, click Add to select the business object for which you are creating a definition. Specify a code and the filter, and provide a filter name. For details on creating filters, refer to Using filters (Fundamentals). | ||
Action definitions are currently only available for the following business objects: • Import-export definitions • CAD import definitions | |||
User running the alert | Specify the user whose account will be used to run the alert definition. By default, this field will be populated with the name of the user who created the alert definition. We recommend that all alert definitions are run by a special user/account and not the personal account of a Planon administrator. See also Run account. | ||
Log successful alerts | Click Yes if you want to receive a detailed list of items that meet the condition. This list is published in Log viewer in Supporting data > Log Viewer. The Source column will display the definition’s code. The User column will display “SCHEDULERENGINEADMIN”. | ||
Log to communication log | Click Yes if you want log a communication log created for the item being notified on. When you enable this field, fill the Communication log field to identify which communication log must be created. This logging can be used only for business objects which are communication log aware. The following fields of the communication log will be populated by default: BeginDate: Time of alerting. Code: Alert definition code. Name: Alert definition description. Comment: Will be extended with a list (comma separated values) of the user codes or email addresses of the people that are alerted. | ||
Action | Select the action to be performed. If this list is empty, no actions are available for the selected business object. | ||
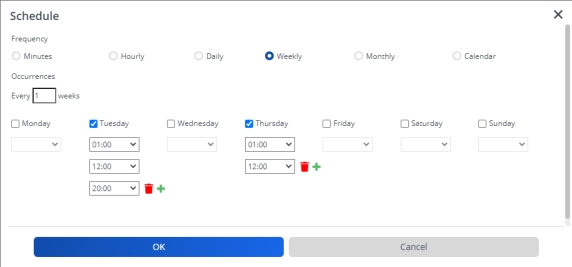
Schedule | Click the Select a value button to open the Schedule dialog box. Enter the frequency and the pattern for sending notifications. You can select: Minutes, Hourly, Weekly, Monthly or Calendar. If you select Weekly, you can specify a the schedule time per day - select the day's check box and choose a time from the list. • The list only shows whole hours and you must use the list (cannot type in the field). • Click the plus icon to add additional schedule times. • The order of scheduled times is not important, the application will sort them in the correct order. • You can schedule a maximum of 5 times per day. • Click the bin icon to remove a schedule time. Only the last schedule time will have a bin icon. • If no time is specified, the schedule will be based on the start date-time of the alert/notification. 
| ||
Start date-time | Specify the start date and time for checking the notification condition. The date-time specified is time-zone-aware, which means that the start date-time is based on the time zone of the user who created the action definition. Example The start date-time (Monday, July 27, 2009 12:00 PM) is based on the user’s time zone (GMT +01). The schedule will start at 6:00 locally because the server is based in Boston, US (EST) and there is a 6 hour time zone offset. The initial start date-time is used to calculate the next start date-time. For more information, refer to Next run date calculation. | ||
Communication log | In this field, you need to select which communication log type must be created for notification logging. Click the Select a value button to open the Communication log dialog box. In the Communication log dialog box, select a business object and click OK. When the Log to Communication log is set to Yes, an instance of the communication log type is created. You can create user types in the FieldDefiner for communication log. Examples of communication log types are: telephone call, email and so on. | ||
Mail template | Specify a mail merge report created for a specific action on a TSI. This report will be used in the response mail of a scheduled action. When specifying the location of the template, to ensure that the template can be found, specify a relative path instead of an absolute path. | ||
Sender’s email address | Specify the e-mail address to be used as sender and reply address when sending a notification mail. This will allow customers to have mail sent from a specific address. If the sender’s email address is not specified, the sender and reply address from System Settings are used. | ||
Use reference date | When set to Yes, the reference date (= current date) is taken into account when using a mail merge report or recipient report. For lifecycle aware BOs (contracts, rentable units etc..) the reference date should always be taken into account for mail merge reports and recipient reports. For life cycle business object, the alert condition also takes the reference date into account. The value of this field is not used when executing an alert condition. For other reference data aware business objects, the reference date is never used when the alert condition is applied. This setting can be used in following situation: When creating a notification on a business object that is not life cycle aware (for example contract actions) and this notification has a mail merge report in which fields of a lifecycle aware business object are added (for example contract.name). |