Running the Suite Database Upgrade Tool
The Suite Database Upgrade tool is a universal tool that is to be used to upgrade existing Planon databases to a newer release.
If you run the tool mentioned in the previous chapter, certain settings may automatically appear in the Suite Database Upgrade tool.
For restrictions / comments / procedures on upgrading the database version in combination with the Planon suite release version, check the Release Notes. |
Procedure
1. Stop all running application server and web server services.
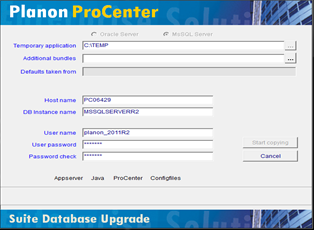
2. Start the Suite Database Upgrade tool by double-clicking ProCenterSuiteDBUpgrade.exe. The following screen appears.

Connection URL does not fit
If the connection URL cannot be handled by the upgrade tool, the standalone-full.xml has to be updated manually before starting the tool. |
The standalone-full.xml is located in: ...\SDUT\AppServers\wildfly-*\standalone\configuration.
Update the connection-url property pn.ds.connection.url.
In the above screen of the upgrade tool you have to enter values. These values will no longer be used because with updating the connection-url, the parameters are removed.
In the above screen of the upgrade tool you have to enter values. These values will no longer be used because with updating the connection-url, the parameters are removed.
Windows authentication
For Windows authentication, update the connection URL property. Replace [HOSTNAME_MSSQL] and [INSTANCENAME_MSSQL] with your values:
<property name="pn.ds.connection.url" value="jdbc:sqlserver://<your hostname>\<your DBInstanceName>;integratedSecurity=true;encrypt=false"/>
For Windows authentication, the windows user who runs the upgrade is used for authenticating the database server. Add this user as a user to the database, otherwise logging in will fail. |
Encrypted Microsoft SQL server authentication
For encrypted authentication, update the connection URL property. Set encrypt=true and add trustServerCertificate=true:
<property name="pn.ds.connection.url" value="jdbc:sqlserver://[HOSTNAME_MSSQL][INSTANCENAME_MSSQL];encrypt=true;trustServerCertificate=true"/>
Oracle driver
If you use Oracle as database platform, the driver of the Oracle version is installed during the installation. If you have updated the Oracle version for Planon already, the standalone-full.xml and the Oracle module.xml have to be updated manually before starting the tool. |
A. The standalone-full.xml is located in: ...\SDUT\AppServers\wildfly-*\standalone\configuration.
Here, you must update the value of the Oracle driver property "pn.ds.driver.name.oracle" to the correct driver version.
B. The Oracle module.xml is located in: ..\SDUT\AppServers\wildfly-*\modules\system\layers\base\com\oracle\main.
Here you must update the Module name="oracleX", to your Oracle version.
3. In the Temporary application field, specify the folder in which the Suite Database Upgrade tool temporarily stores files.
Through Java, a JDBC connection is made with the database; this requires an application server and program files. The Suite Database Upgrade tool temporarily copies software to the temporary application directory; this requires read/write access to at least this section of the disk.
Log files created are also stored in this temporary application directory. For identification, the log files contain a date/time stamp in their name.
4. In the Additional bundles field, specify the location of the bundles, which are not included by default in the upgrade tool.
By default, the application also contains bundles that are delivered as part of the upgrade tool. These bundles need not be added manually to the upgrade tool.
Only specify the path for the additional TMS bundles that are specifically created for you. Put the server software for the TMS bundles in a separate folder and point to this folder in this field.
General remarks for handling bundles
◦ When you run the Suite Database Upgrade tool without specifying the additional bundles you have in use, the tool detects that the metadata in the database is not equal to the metadata in the code. During the upgrade the items in excess will be deleted. This will only be successful for items without data. For example, additional TMS System Reports will just be cleaned-up because they do not have user data, only settings/metadata.
◦ The standard bundles (or a newer version of these bundles) are already included in the upgrade tool. You must not point to the application server’s Planon bundle folder containing these bundles, as this contains a lot of code. If you do so, you may include the code twice but with different version that may result in a version mismatch.
◦ The following error message is displayed if you include exact the same bundles as are already present at that location.

◦ If the set of bundles in your environment does not match your database, the following situation may occur:
- If there are more bundles in the environment than in the database, the application server will go to upgrade mode. Suite DB upgrade tool should be used to add meta data of the new bundles to the database.
- If there are less bundles in the environment than in the database, the application server will go to upgrade mode to remove meta data of the new bundles.
- If user data exists in these bundles, you cannot remove these bundles. Hence, it is important to have the same bundles in your environment as in the database. If you add the correct bundles to a running application server the application server will automatically switch back to normal mode.
- If a newer version of the bundles is in the environment as in the database, an upgrade is required. Suite DB upgrade tool should be used to update the meta data to the new version of the bundles.
- If an older version of the bundles is in the environment than in the database, the application server cannot be started. Note that the bundles cannot be downgraded. However, if you add the correct bundles, the application server will automatically switch back to normal mode.
For customers upgrading from a previous version to this version
◦ Ensure that you upgrade all the not standard TMS bundles to this version.
◦ When starting the Suite Database Upgrade tool, only the Suite Release bundles from version 2013 and higher will be displayed.
5. Click Start copying to upgrade the existing Planon databases to a newer release.
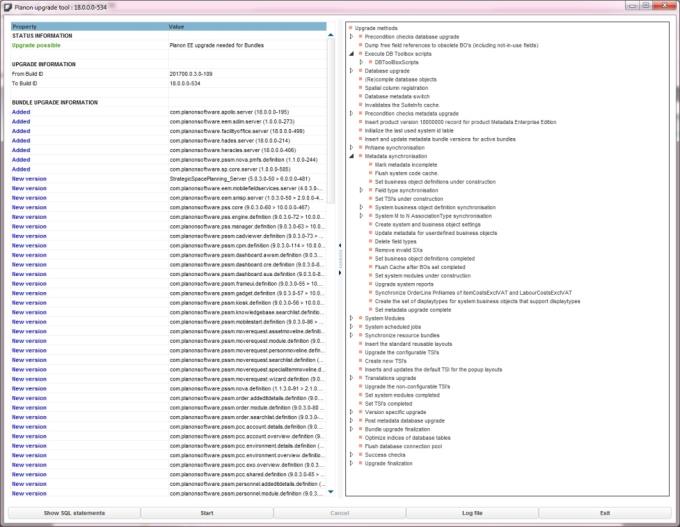
If the data in any of the fields in the Upgrade tool is incorrect, and if you click Start copying, you cannot proceed with the upgrade. The application server stops and whatever is installed locally, remains. Correct the relevant before you click Start copying again. The following upgrade screen appears. The tool installs a separate application server and runs the Planon Upgrade client.
The status information appears in the top-left panel. For more information on status information, refer to Upgrade Tool Messages Appendix upgrade tool messages. |

The left panel displays version information about the status of the bundles and database connection.
The required upgrade steps are listed on the right. When these steps are executed, the time required for each upgrade step is displayed on the right (as well as a total duration of the upgrade).
6. Click Start. The upgrade steps are performed.
7. Click Exit when the upgrade steps are complete.
8. You will come back to the first screen. Close the upgrade tool.
The Suite Database Upgrade tool then removes all temporary files except the log files. You have now successfully upgraded your Planon database. The log files will now be available in your temporary application directory.
You can now proceed to install Planon ProCenter |