Adding a reservation in the reservations planboard
You can add reservations for all reservation units on the reservations planboard. The procedure for adding a reservation is the same for all reservation units. Reservations can be added in any period view (day, week).
Procedure
1. Go to Reservations planboard > Space units / Asset units / Flexible workspaces.
2. Select the relevant reservation unit.
Point to the required start time on the reservations planboard.
Point to the required start time on the reservations planboard.
3. Click while pressing down the left mouse button, drag the cursor to the required end time and release the left mouse button. A date-time tooltip is displayed as you click on the reservations planboard.
The working and non-working hours of a reservation unit are determined by the Calendar. Non-working days / hours are displayed in gray background color on the reservations planboard. |
Non-bookable periods are also displayed in a gray color on the reservations planboard. If you try to create a reservation during non-bookable period, an error is displayed. For more information on non-booking periods, see Supporting data . |
4. The reservation is created. The Reservation cost specifications pop-up appears if the Tariff group field has a value for the selected reservation unit. Click Close.
The reservation for the selected time is displayed on the reservations planboard.

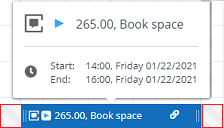
By hovering the mouse over the reservation, you will see details such as the start/end date-time, reservation number and the status of the reservation. The link icon indicates that the reservation has subreservations / suborders. The gray period before and after the reservation indicates 'transition periods'. For more information, see Transition period.
You can edit the reservation by double clicking on the reservation. You will be navigated to the Data panel for editing the data. For information on field descriptions, see Reservation fields.