New reservations planboard - overview
The new reservations planboard provides a graphical representation of reservations in Planon ProCenter . There are various filters, controls and other menus to create a reservation or search for reservation units depending on your requirement.

The individual components of the reservations planboard are explained in the table:
Component | Description | ||
|---|---|---|---|
1 | These tabs enable you to navigate between various types of reservation units.
| ||
2 / 4 | The two Filter bars enable you to filter based on various criteria. Filtering is only applied to the reservations displayed on the screen (current reservations). For more information on searching and filtering, see Searching/filtering. | ||
3 | The  button opens the Show / hide options menu that allows you to: button opens the Show / hide options menu that allows you to:• Show / hide archived reservations • Show / hide cancelled reservations • Show / hide related orders • Show / hide archived reservation units • Only show available units • Filter by facilities • Filter by desk configuration The settings of this menu are remembered as a user setting for the logged in user. | ||
5 | The Search bar enables you to search for reservations. Typing in the search bar starts a search in all reservations. However, filtering is only applied to the reservations displayed on the screen (current reservations). For more information on searching and filtering, see Searching/filtering. | ||
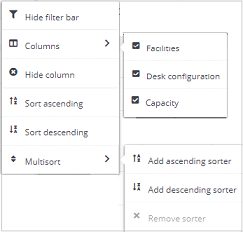
6 | Column headers represent relevant fields of the reservation unit. Clicking on the arrow mark will sort the column in ascending or descending order. You can 'multisort' by sorting other columns as well. Use the search box in the Code & description and Capacity fields to quickly search the list. By typing a keyword or number in the box, you will filter the reservations units. Access the shortcut menu by right-clicking on any of the column headers. With the shortcut menu, you can configure which columns are displayed on the elements panel and select sorting options. With the Hide filter bar and Show filter bar options you can hide or display the filter bar.  | ||
7 | These toggle buttons enable you to switch between the Reservations planboard view and the Data view. | ||
8 | This button enables you to select a reference date, to view the reservations available on that date. By default, Today is selected. The Previous and Next buttons enable you to navigate to the previous day/week or next day/week, depending on the view selected. | ||
9 | These buttons enable you to select a day/ week/ month view. The reservations planboard displays reservations based on the period selected. | ||
10 | This is the reservations planboard interface where you actually add reservations. The time scale is at the top and the reservation units are on the left. The time scale that is displayed depends on the view you select. The current time is displayed in a small orange box and a red dotted line. They are there to support you when planning. Working and non-working hours are displayed in white and gray respectively.
|