Report definition field settings
The selected fields will be represented as columns in the actual report. The column width, column title and other settings can be adjusted in the Settings section of the Report definitions and settings window.
Depending on the field type and the report type there are several variants of the Settings section.
Field | Description | ||||
|---|---|---|---|---|---|
Full name | This read-only field displays the complete name of the selected field. | ||||
Alternative column text | Enables you to customize and replace the Column text. | ||||
Column text | The column text indicates the name given to the column in the Selected fields section. In addition, the column text is also printed above the respective column in the report itself. The field description is specified as default. | ||||
Width | Here, you can specify the column width, measured in centimeters (default is 2 cm). | ||||
Mask | For date-time fields, numeric fields, dimension fields and money fields a mask can be specified. Masks help you to specify the way in which field values are displayed in a report. For example, a date can be shown in various formats, such as 01-05-2020, 1-5-20 or 1 May 2020. Depending on the field type, different mask pick lists are available from which you can select an example. The mask pick list can be opened by clicking the pick list button in the Mask field. However, the contents of the Mask field can also be entered or modified manually. Numeric fields By using a mask you can determine how a number in a numeric field is displayed in a report. You can select an example from the Select a numeric mask pick list. You can also enter or modify a mask manually in the Mask field. For a description of these fields, refer to Numeric fields. Dimension fields You can use a mask to determine how a value in a dimension field is displayed in a report. Select the required mask from the pick list to display the unit of measurement (for length, area, volume or amount/area) after the value.
Money fields By using a mask you can determine how an amount in a money field is displayed in a report. You can select an example from the Select a mask for amounts pick list. You can also enter or modify a mask manually in the Mask field. For user reports, you can use the following masks: • #,### Use this mask if you want to leave out the decimals of an amount. • #,###.00 Use this mask if you want to show the thousand separators of an amount. The mask can be used as 9,999.00 (US) or as 9.999,00 (European). The mask must be configured in one way: ◦ comma (,) as thousands separator ◦ period (.) as decimal separator When you run the report, the report is displayed according to the language settings of the logged in user. Date-time fields You can specify the way the date and time is included in a report in the date and time fields. In some cases this depends on the Regional settings specified in your Microsoft Windows operating system. For more information, refer to your Windows documentation. You can select an example from the Select a mask for dates pick list. You can also enter or modify a mask manually in the Mask field. For a description of these fields, refer to Date-time fields.
| ||||
Horizontal alignment | Here, you can specify whether to left align, right align, or to center the text in a report. | ||||
Vertical alignment | Here, you can specify whether to align bottom, justified, center or top. | ||||
Group by this column | Use this option to group and sort data according to a specific field. If you select this option, the data will automatically be grouped. A heading is created for each new group. | ||||
Sort by this column | Use this function to sort data (alpha) numerically. You can sort data in ascending or descending order. | ||||
Display each group on a separate page | If enabled, each group is started on a new page. This option is only available if the Group by this column option is enabled. Example of final report: each group starts on a new page 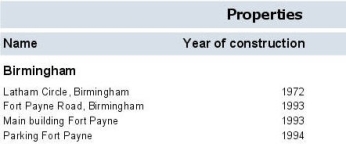 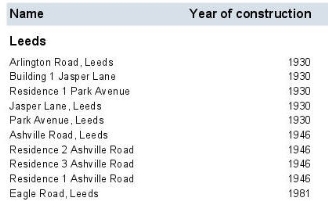 | ||||
Group totals under this column | If enabled, a subtotal per group is placed at the end of a column. This applies to numeric fields and money fields. To enable grouping totals, the following conditions must be met: 1. The Print field should be selected. 2. The field should be numeric. 3. Show group fields in detail line option must be selected. 4. Group by this column option must be selected. 5. Any grouped fields must be selected. Example of final report This example displays a report on order costs, subtotaled per group. 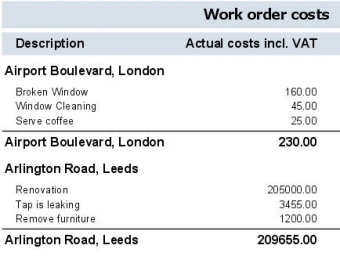 | ||||
Totals under this column | If enabled, a grand total is placed at the bottom of a column. This applies to numeric fields and money fields. To enable grouping under this column, the following conditions must be met: 1. The Print field should be selected. 2. The field should be numeric. 3. Show group fields in detail line must be selected. 4. Group by this column must be selected. Example of final report This example displays a report on order costs, with subtotals per group and a grand total. 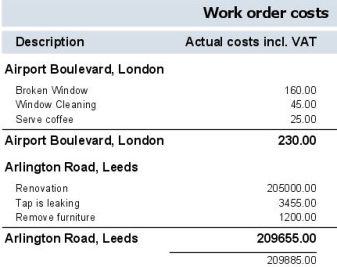 | ||||
Print column | Use this option to specify whether to include a field in the report. Example You have created an expression for a name. The expression is as follows: Initials + Prefix + Surname. You decide to sort by Surname. You can add an additional column for the surname, which you do not want to print. Example of the final report 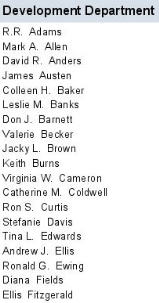 For more information on expressions, refer to Working with Expressions. | ||||
Display each group on a separate page | Select this option to display the data of each group on a separate page. To enable this, you must first select Group by this column. |