Adding a virtual device (via Planon)
Planon aims to provide the best out-of-the-box experience for using a Use Case app. This includes being able to configure and test use cases in non-Production environments.
In a Production environment you can add devices following these steps:

1. Download and install the app from the Marketplace
2. Configure the app
3. Create a Gateway (automated)
4. Onboard devices (automated)
If the gateway is properly configured, devices are automatically onboarded.
5. Create digital twins (manually or automated)
6. Link devices to your digital twins
Whether devices are linked manually or automatically depends on the previous step. Typically, if you have opted to create digital twins manually (Step 5), this also goes for linking devices
The device data that is generated will be sent to the datapoints in the Planon application.
However, for non-Production demo environments, Steps 3-4 are not available, making it more laborious to use actual devices. Instead, you can depend on using virtual devices to generate mock data.
Virtual devices
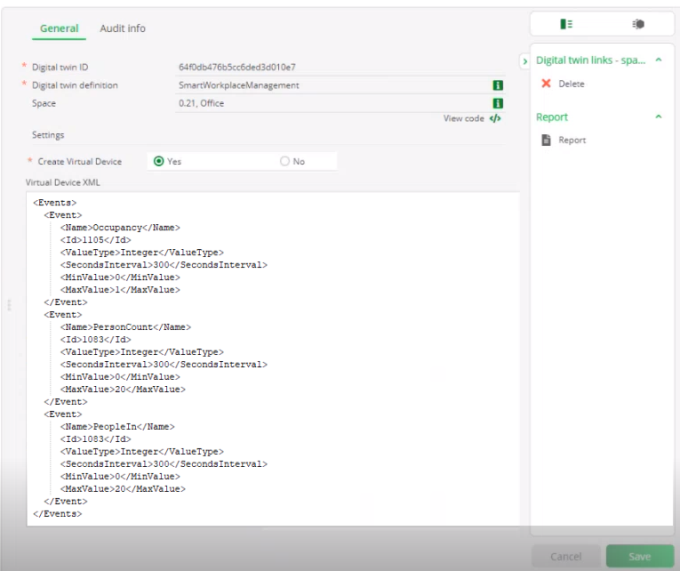
At Digital twins level, you can create a virtual device per digital twin.
To use a virtual device, set the field Create virtual device? to Yes and in the Virtual device XML box you can specify events in XML format.

To generate mock data, there are two ways to include events as XML:
• Manually specify events in XML.
• Automatically, by using the Planon application itself.
Manually
You can create your own XML and when you do so, make sure to use valid XML. Paste the XML into the Virtual device XML.
Sample XML
<Events>
<Event>
<Name>Occupancy</Name>
<Id>1105</Id>
<ValueType>Integer</ValueType>
<SecondsInterval>300</SecondsInterval>
<MinValue>0</MinValue>
<MaxValue>1</MaxValue>
</Event>
<Event>
<Name>PersonCount</Name>
<Id>1083</Id>
<ValueType>Integer</ValueType>
<SecondsInterval>300</SecondsInterval>
<MinValue>0</MinValue>
<MaxValue>20</MaxValue>
</Event>
</Events>
<Event>
<Name>Occupancy</Name>
<Id>1105</Id>
<ValueType>Integer</ValueType>
<SecondsInterval>300</SecondsInterval>
<MinValue>0</MinValue>
<MaxValue>1</MaxValue>
</Event>
<Event>
<Name>PersonCount</Name>
<Id>1083</Id>
<ValueType>Integer</ValueType>
<SecondsInterval>300</SecondsInterval>
<MinValue>0</MinValue>
<MaxValue>20</MaxValue>
</Event>
</Events>
Automatically
Planon IoT supports a number of IoT Use Cases. On the Technical details tab, the Digital twin definitions of these use cases specify a number of datapoints. These datapoints obviously differ per use case.
When you are using one of the datapoints of the use cases for your demo, the XML will be automatically populated in the Virtual device XML box.
You can edit the values as required. For other datapoints, you should manually specify the XML.
What happens next?
Once the XML is specified (manually or automatically) and you click Save, a background action is triggered that creates a virtual device in the Planon IoT Platform and links the device to the digital twin.
Subsequently, the mock data will be sent to the digital twin in the Planon application.
This enables customers to configure and test use case in non-Production environments by using lifelike data.
• When Create virtual device? is set to No, the field is cleared, and the Virtual device XML field becomes read-only. The virtual devices in the Planon IoT Platform are deleted, but your digital twin remains. • Each device requires a Product, so a dummy Product is created when using virtual devices in the Planon IoT Platform. Planon doesn't delete these dummy Products, allowing customers to delete them if needed. • XML validation occurs upon saving your digital twin. If the entered XML is invalid, a prompt will appear. |