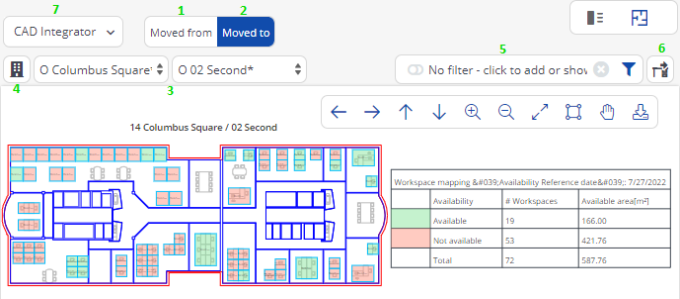
Graphical viewer functions
The graphical viewer has a navigation panel, one or two legend(s) and a title bar in the drawing. By default, the code and name of each workspace are displayed. The element list next to the drawing displays the selected move lines (not shown in image). In addition, the graphical viewer includes multiple features. The most important ones are shown and described below:

1. Moved from: The graphical viewer only shows one blue workspace. This is the workspace occupied by the person from the selected personnel move line on the day before the move date. He/she will move from this workspace.
2. Moved to: The graphical viewer shows the availability of the workspaces for the current date.
The future occupancy and area of the destination workspace is checked against the start and end date of the move line. If there is a 'conflict' the workspace is marked as Not available. |
3. Drop-down menus for Properties and Floors: select the property and floor whose drawing you want to see. The drop-down menu for properties is a dynamic list. This means that properties are displayed on the basis of the selected person move lines in the element list. In addition, you can also add 'static' properties to the list by using the property pre-selector (see item 4). The following symbols are used in the drop-down:
◦ O = The property / floor includes at least one workspace that meets your requirements.
◦ X = The property / floor does not contain any workspaces that meet the requirements.
◦ * = This is the property / floor where the person from the selected move line is located on the day before the move date.
4. Property pre-selector: If the property pre-selector is active, properties are added ‘statically’ to the drop-down menu. These statically added properties are saved per user. It is possible to add 'static' properties even though they have already been added dynamically by the system. Nevertheless, these properties will appear only once in the list.
The more static properties you add, the more properties and floors must be loaded into the drop-down list. This may have a negative impact on the performance! |
5. Filter: it is possible to create your own filters. The available filters are: Cost center, Department, End date, Max. occupancy %, Start date, Tariff group, Workspace, Workspace type. If a filter is applied it is possible some workspaces may become colorless (white). These are workspaces outside your filter criteria.
The filter is taken into account when showing the availability icons in front of properties and floors which makes easier to select the correct property or floor. |
6. Release workspace: this button on the Moved to viewer will clear the To workspace field on the Data view tab for the selected move line.
This action is irreversible! The workspace will turn either green or red (depending on the availability), after its release is accepted. |
7. CAD Integrator drop-down menu: it is possible to show additional space mapping or workspace mapping in the viewer. It is also possible to show them both at the same time. By default no mapping is active. Mapping remains activated until you deactivate it. To deactivate mapping, click on the CAD integrator menu, go to the workspace or space mapping submenu and select None, or click the Clear mapping button at the bottom right of your screen.
8. Title: to move the title, double click on the title. You can drag and drop the title anywhere in the drawing.
9. Legend: To move the legend, double click on the legend. You can drag and drop the legend anywhere in the viewer or even on top of the drawing.
For more information on the actions you can perform on a floor plan in the graphical viewer, see CAD Integrator. |